


Update of my plans
Lots of bloggers are using January to commit to Make Nine, or to do the Pattern Review Sewing Bee or SWAP challenges, or just to finally get their wardrobe sorted.
I think I have sorted mine. I am still in uniform, although I have branched out a tad. I now have three pairs of corduroy trousers – navy, bottle green and pinkish brown (not my colour, but I bought them in the sale thinking I could dye them but then came to like them as something different). They are far enough away from my face to look OK. I wear these soft, slightly baggy, artisan type strides for work everyday (unless a formal meeting requires more effort). I wear them with a Uniqlo T shirt, a hand knitted jumper, a down jacket (navy, green or brown), and navy trainers. I have a down coat, lots of hand knitted hats and a ruck sack that needs replacing as the zip is broken. I think I look fairly stylish, but by international standards very casual. I work in social housing and I feel the look is appropriate, so I am happy and I now have a tiny wardrobe. Summer will bring more variety and colour and style, but comfort and warmth are the top priorities for me now.
The Transform T challenge didn’t really thrill me. Here is my effort. I just pleated (Gres-style) one of Nick’s T shirts, right along the shoulder line from neck to sleeve cuff. I didn’t like wearing a baggy T shirt even though the structure was quite nice. I like my tops to cling – at least the underlayer. It’s not just the vanity of revealing the feminine shape – I actually dislike air billowing against my skin (unless the weather is really warm). My two sewalong friends – Helene and Sue Stoney – did much better than me. Do check out their Instagrams.

After a difficult year at work I returned after Christmas full of joy and enthusiasm for the next stage of our merger. I am still very busy and a little bit stressed but we have broken the back of it and are starting to make progress. I have to admit the job has really stretched me and I have spent my spare time less `’productively” in terms of making nice things. I have been knitting, but in a relaxing, somewhat mindless way. I have made things for family and friends as it gives me pleasure. I am doing lots of physical activity – walking, swimming, yoga, dance and even Tai Chi. But I need to focus intellectually on the job and I am developing staff and researching what sort of management we need for the 21 century. I have a blog about management and work and I am using this to develop my ideas.
I am also going to write a short memoire of a 1974 road trip. We travelled from New York, Montreal, through Ontario, Manitoba, Saskatchewan, Alberta, British Columbia, Vancouver Island, Washington, Oregon, California, Nevada, Utah, Colorado, Nebraska, Iowa, Illinois, Indiana, Ohio, Pennsylvania and back to New York. Mainly hitchhiking. Remembering all the (sometimes hair raising) details is difficult after so many years. But once it is done I am considering retracing my steps. Here are a couple of the pictures – the Indian block printed T shirt was red, worn with a maxi skirt and wooden clogs.


But the long and short of it is I am going to recognise the inevitable and park the blog and associated social media. This is my 970th post and I am not sure I have much left to say! I am here for you if you want to get in touch, meet up or ask anything. I will post from time to time if I have something to share but I’m done with the regular schedule. I feel loved, and love you, but I am going to take a break: I know you will understand.
The beret
I have been thinking about hats for a while, because I love them. I really feel dressed in a hat. I like to wear them in summer, to protect me from the sun. And I love to wear them in the winter to keep my ears and head warm. I enjoy millinery, and one day I will do a serious course and make a hat with a lobster, a shoe or a telephone.
I like classic hats and spent some time on a course where I made a few turbans. And then, more recently, once I learned to knit I knitted a warm, ear covering hat. So, over Christmas, I dedicated myself to another classic hat – a hat I love – the beret. My Dad used to wear a French beret, and he looked amazing. The photograph is of a very cool French fisherman in the 1940s. When my father was older he never wanted anything for his birthday or Christmas, claiming quite correctly that he had everything he ever needed, but he did admit he would like a French beret. So Nick and I found ourselves in a beret shop in Brittany. Literally – a shop which sold berets in every shape and size. What was interesting was the varying depth of the crown – some were very wide – more in the Basque style I would say. We bought a lovely, authentic, very deep navy woollen hat, with a soft leather band, and a nice French label, sewn in. My Dad loved it.

The beret has so many associations – school uniforms, the military, French chic, and radical movements from Che Guevara the Black panthers. Men’s headwear that women, from Coco Chanel onwards have appropriated. Traditionally made by shaping naturally waterproof felt, the two main ways you can easily make one at home is using a pattern, or knitting one.

I knitted a few, taking my basic instructions from Elizabeth Zimmermann, who calls these a Tam O’Shanter. The difference is that the Tam is a Scottish bonnet, worn straight and features a pom pom. A beret is usually worn to the side, and it has a rats’ tail.

In summary the pattern is as follows:
Using 5mm circulars (or the right size for your gauge and yarn), and DK weight, cast on 90 stitches (100 for a man, and 80 for a child). Knit ten rounds in stocking stitch, knit one round in pearl, ten more rounds of stocking stitch. Increase K2 M1 (or K3, M1 if you want less fabric, but I don’t recommend). Now knit 25 rounds, then decrease regularly (ever other round) until you get to the last 20 or so stitches, then decrease every round so you don’t get a point. When you have 7 stitches left thread the yarn through and pull them up. Darn it nicely together and finish the ends.Once it is complete soak it and block it on a dinner plate. This gives it a nice clean line. Add a pom pom or rats’ tail. To make the rats tail I crocheted the yarn, folded in two then stitched together, and inserted it in the hole at the centre.

You can of course include colours and patterns, on the brim or the hat, and you can do a firmer or floppier version depending on your stitch density and yarn of choice. If you do colour work it will be warmer and a bit firmer. I made all my hats from left overs – most of them are cashmere, just because I don’t want anything scratchy near my face. If you use a smaller needle and four ply yarn you can do fair isle patterns, but I wanted quick results.

I may make a few more. Ideal as presents, always wearable. I managed to squeeze a little one out for my Grandson.

Even when its cold you can just pull them down over the ears. I like a beret much better than a beenie, and if you have an angular face (like me!) then the strong straight line across the hat is more flattering than a head hugging, round look.

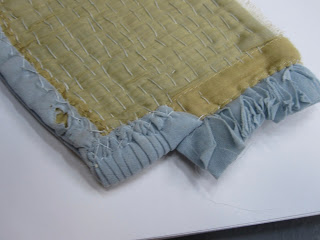
If the hat comes out just a tiny bit too loose then sew in a piece of millinary gros grain, measured to fit you head exactly, around the inside of the hat band easing the knitting in to make sure it fits. If you beret is a bit too floppy you can include a circular piece of interfacing across the brim. This means you can wear it with more of a halo-like look. And finally if you want to make your beret more hat-like use the sewn pattern at the top of this post to make a fabric lining. Lovely.
The Elizabeth Zimmermann Wishbone sweater

Elizabeth Zimmermann’s Knitter’s Almanac gives the knitter a project a month, for a year. I wouldn’t recommend most of the projects – knitted Christmas decorations, polo shirts and tights for babies? I do’t think so. However I really liked the look of the jumper that sits at the bottom (centre) – a funnel-necked, raglan-type, hemmed sweater. I liked even more that this was a quick knit. It is the December project and the chapter is called “Hurry-up Last-Minute Sweater” which is a bit twee. I can certainly knit a jumper in a month and so this didn’t seem anything special. But I had a go at it and I like the design very much.
Here it is in delectable black and white. The thing I don’t love about the sweater is that I think the sleeves are a bit baggy. What is really nice, and not that obvious from the photo is that the shoulders are created by decreases along the shoulder line. The funnel neck is nice too.

Elizabeth Zimmermann Wishbone sweater
I started knitting at the beginning of December and finished it in about ten hours. I used some heavy, thick, slightly glossy viscose yarn I got from Colourmart, and I used it double. It had tremendous definition and you can see that one of my stitches in the inverted V yoke is a bit uneven. I have learnt my lesson and would go slow on this part of the journey.
As a change, for me, I made this one long – hip length. I thought the colour lent itself to a fisherman’s jersey look which necessitated a roomy look. In general I go for a slimmer fit, but I have enjoyed wearing this jumper alot, including over other jumpers. It works well with my Uniform suit which I wore for whole of December – so something like two and a half month (washing the trousers ever week). The ribs of hand knits go so well with the corduroy whales.

I made it up exactly as specified, but I didn’t do hems at the base or cuffs. I just left them as they were. It rolls a bit at the hem but the sleeves are pretty stable.
Zimmermann says you cannot make this sweater in a smaller gauge, and I am not sure I would want to. But I think I might like to make a narrower sleeve. On the other hand it operates like a true raglan (compared to her seamless Raglan pattern which is just an adaptation of a yoke sweater. A Raglan is designed with a much more comfortable fit, so it can be worn (usually as a jacket) over something else. So something to bear in mind if you are thinking of making this jumper.
I won’t give instructions on how to make this, but as you can see it is exactly the same as for the seamless sweaters we have made before – the colourful yoke sweater and the seamless raglan. When you join the sleeves and body you decrease at the body side to create the inverted V. Once the body stitches together (front and back) equal what you have on one sleeve you decrease from the middle of the sleeve (on the shoulder line). Might be a nice one for a knitalong next year.

Anyway I hope you had a lovely Christmas break. We spent it with my Mum and some of the family. On New Year’s Eve I imagine I will be having an early night. But Happy New Year to all my friends!
Anni Albers exhibition at Tate Modern

I had the great privilege of visiting the Anni Albers exhibition at the Tate Modern, with my friend Bridget – the one who also taught me to weave. I fell for weaving immediately – deciding that one day, perhaps on my eventual retirement from work, I would ask for, or buy, my own loom. With more time on my hands I felt I really might achieve something marvellous.

As a Tate member Bridget was able to get me in after work, to see an exhibition of Bauhaus textile designer Anni Albers. Many of you know that the Bauhaus was a radical art school, established by Walter Gropius in 1919. Something you may not know is that his London home – where he came to flee the Nazis – is the Isokon building, which we – Notting Hill Genesis – own. In July English Heritage put a blue plaque on the flats, and Wolf Burchard (front row beige jacket) gave a moving speech about his Great Uncle Walter.

Anni Albers (1899 – 1994) was a German Jew who became a leading member of the Bauhaus school, and eventually head of the Weaving Workshop. Although she started life as an artist, she was drawn to weaving as it was one of the few areas open to women at the time. She left Germany with her artist husband Joseph in 1933 and went to work at the newly established Black Mountain college in North Carolina. They moved later to Connecticut where their Foundation continues.
Many see Albers as one of the most important female artists of the 20th Century, but perhaps one who is not well enough known due to either her sex, or her medium (textiles) or both. Much of her art work was based on horizontals and verticals (Matisse inspired), often in neutral colours and sometimes in interesting materials such as metallics, cellophane, flax and cotton. Bridget, and some other experienced weavers she spoke to, attested to the amazing technical skills that some of this work required.

Bridget was mesmerised and fascinated by this red work “With Verticals” She said it was exceptionally hard to achieve this effect and she could only guess how it was done. For me it was a beautiful textile. I really liked the way the subtle, almost ghostly, verticals worked against the obvious ones which interrupt and rearrange the twill patterns in the cloth.

With Verticals (1946)
There are many wall hangings to be seen – most of them are like paintings actually – and I felt this was an artist working with yarn rather than a weaver, but of course the distinction between art and craft is rather superficial. I loved the work especially when she created colourful, lumpy weavings.


The Albers made many trips abroad for inspiration, mainly to Mexico, where they sought out ancient buildings, but also bought and studied woven and stitched textiles. There are a number of fascinating and priceless Mexican and other artefacts in the exhibition, and we can see how the strong colours begin to influence her work.

It’s almost Christmas. I have knocked off work for about ten days, and I will be very glad of the rest. I have found this year stressful and hard going. I have spent much of my spare time recuperating in the country, and I haven’t done a huge amount of making or blogging. I think things will ease off next year and I am very much looking forward to new and interesting challenges.
Let me finish with some absolutely joyous jewellery, designed by Anni Albers. Just the sort of present anyone would love to receive, made from ordinary but beautiful things. And may I thank you for your support, your wise advice, following the blog and joining in with the various challenges I have set myself, reading the book, meeting up with me, and may I wish you a very Happy Christmas.

Washers and Gros Grain ribbon necklace 
Kirby grip necklace 
Necklace made with screws and pearl beads
Madame Gres – T shirt transformation Inspiration
Madame Gres (1903 – 1993) (pronounced Grey) was a Parisian couturier who created beautiful bias and pleated dresses, inspired by Grecian styles and lines. Her house, under the name of Gres, was opened in 1942 and she mainly used specially produced plain silk or wool jersey in golden beige, cream and red. During the Second World War, in Nazi occupied Paris, she made dresses with red, white and blue silk in an act of defiance, until they closed her down.
Although she was not commercially successful, becoming bankrupt in the 1980s, she discovered and developed techniques for draping on a custom dress form, the create fluidity, closely defined curves, and elegant shapes to flatter the female body. She didn’t always sketch her designs, but worked with yards and yards of silk chiffon or drapey jersey to create the structure and shape to enhance feminine curves. This would be done on the dress stand or directly on the wearer.

Let’s have a look at some of Madame Gres pleating close up. Tiny knife pleats are made in the fabric, each one pinned, to a roll or pad, along its length. Then the pleats are stitched down along their whole length, and finished neatly, to create a firm piece of fabric for the bodice. The lower end would be released to form the skirt.She avoided seams where ever possible.

The reverse of this piece shows how the piece was created. You can see the ribbon stay which prevents the pleats splaying out.
Here is a video about her work and exhibition, featuring Olivier Saillard. And a second rather poor quality video from Madame Pico who worked for Gres.
Gres produced a perfume, and also licensed some designs for Vogue and McCalls. Many of the patterns are of elegant structured day wear, but this marvellous draped evening dress is available as a digital reproduction in a large size.
I tried the Gres style pleating on the shoulders and across the sleeve of one of Nick’s “old” T shirts (not so old, and one of his favourites, but I liked the shape and colour). I will stitch these pleats down.

Here is another idea. I used a striped T shirt and gathered the fabric up fairly quickly, using the stripes for guidance. I will smock this T shirt, which has a skull pocket. I think the delicate “little girl” approach to smocking will contrast nicely with the darker shades, and slightly edgy look.

I have a few more transformations which I will share next week. Any one else making progress? In the meantime Sue Stoney has done a super job. Do go and have a look.
The A 5 Art show
I want to share a project I am involved in. Every two years we have a resident art show – including paintings and other art work they have produced. The items are sold and all the proceeds go to support our tenant welfare fund. This allows small grants to be given to individuals and families who need help, or to organise events and outings for groups of tenants in care schemes. The private view is a truly amazing event with tenants, their families and friends celebrating their achievements and the power of art and creative endeavour.
This year the theme was A5 art – the size was restricted; staff were allowed to submit pieces as well as tenants: and professional artists were encouraged to provide a painting or two. Everything is on sale at the same price – £50 – and we are keen to sell as many of the 300 items as possible to allow us to boost our funds for helping residents.
I did a couple of embroideries for the show and one sold on the night. I also bought a small painting by a resident.
With a team of artists, curators and tenants I helped choose the art that would be displayed and sold. We ended up with more than 300 pieces. If you would like to check out the art work, look at our special site.
When I got there the volunteers were putting on their T shirts and getting a team talk.

Most of the volunteers are our staff from our housing, finance, and care and support teams. Their job on the day was to help people enjoy the event, buy the art work, meet the artists and to look after the cloakroom.
Once the artists starting arriving I spoke to as many as I could. The artists including tenants who had participated in workshops and staff members who had simply done a painting or art work in their spare time.
Jackie is a very regular contributor to our art shows. She always paints flowers (top left). I think of these as tulips, and find the colour combinations interesting and appropriate.

A longstanding tenant representative is Mary. She was on the Board of Notting HIll when I was appointed and she appointed me, so I have always had a close relationship with her. Since then she has retired, had a number of operations and now uses a crutch to help her walk.

Dwaine was inspired by the world cup and several of his pictures are based on the national flag of nations. This one is of the French flag; he also created a Croatian flag. The picture I bought is the green one in the top of this photograph, but I really liked his French flag (bottom). Dwaine enjoyed having his photograph taken.

I met Bridget Metcalfe who lives in our Chelmsford scheme. She is a singer, journalist and radio broadcaster who also enjoys art. She recently had an exhibition based on one of our building sites.

Yvette is a long standing member of staff, supporting our Housing Officers. Her colourful painting of a girl (centre) was influenced by Star Trek.

Wayne, who doesn’t speak, had contributed his spatter paintings. However he wanted his portrait taken against this colourful selection by other artists.

At the end Mandy Worster, the organiser, and I, made short speeches to thank the contributors, the artists, the gallery and the volunteers. We both implored people to buy a painting with all the money going to help our tenants in need. What an amazing and uplifting event. I am so proud to work for an inclusive, creative community – Notting Hill Genesis.


#TransformTSAL – Fabric Manipulation Techniques
Some time ago my friend and fellow Board member Linde Carr lent me a lovely book by Colette Wolff, The Art of Manipulating Fabric. It’s a comprehensive book, rather scholarly, and presented entirely in black and white with each sample made in plain unbleached cotton. It really is a source book and not something you would want to read cover to cover. But there are many interesting techniques featured in the book and I will be using it as I create my Transformed T-shirt.

Let’s have a look at Saillard’s designs. Here we see a deep slash in the front (unfinished I think), with two areas of controlled pleats, sewn to the body at left and right front, so that the hem is brought up. The neckline and sleeves are unaltered.

Below I have more images, and descriptions of how the work is done.
Women’s Wear Daily describes Saillard’s process:
“Sleeves tucked up into graduated architectural caps, a neckline gathered down to reveal the nape of the neck in the manner of a kimono, delicate pin tucks bisecting the front, seams covered in silk piping — the techniques mined the repertoire of couture to cunningly twist the jersey into new shapes.
Stitches holding them in place, and the occasional self-tie allowing subtle adjustments, there wasn’t an adornment in sight, save for whip-stitched crosses marking the front of an item — for reference only as some of them can still be transformed further by being worn back-to-front.”
Interesting!

Vogue Magazine writes;
“The now-exquisite high-low pieces drape and swathe over the body with a T-shirt’s insouciant elegance, but inside they are finished like haute couture dresses, with three little red thread cross-stitches to remind the wearer which side is the front of the garment; grosgrain inner waistbands to secure them in place (while maintaining the illusion of insouciance); and hand-finished organza panels to stabilize those signature pleats.”
Even more interesting!

I am not particularly advocating copying Saillard’s designs directly, unless you want to. Most of my followers commented that the finished product is too extreme-looking for ordinary women, and that may be true for you. For myself I initially found T-shirts that are closer to my own size, and then pinned them where they seem to need to be taken in. Once I have decided where it would look best for the fullness to be supressed I will do some pleating or pin tucks or smocking to pull them in, in a way that creates a wearable and flattering look.
Mary asked for rules for the #TransformT Sew a long, so I will give some, but feel free to break at least one of them.
Rules
- Use a traditional cotton T-shirt several sizes too big for you.
- Change the shape using slashes, pleats or other types of shaping such gathering, tucks, darts or smocking
- You cancombine or layer two T-shirts if you wish
- Have it done by early January and let me have a photograph for sharing.
Tips
- Start with a cotton T-shirt that is too big for you. Here is a suggestion. My T-shirts from Primark which cost £2.50.
- Put on yourself, or your dress stand and play with the look until you find the right place to put the pleating, using pins, safety pins or rubber bands.


- Decide if you want something very wearable and subtle, or something more experimental and out there. Maybe one of each?
- Consider how you are going to take up the excess. I have suggested pleats or other types of shaping such gathering, tucks, darts or smocking or pin tucks. If you wish I can run through each technique, but most of you know all this, and for those that don’t Google will provide. Saillard’s seamstresses have mainly used pleats on top of pleats, stacked pleats, to create a more 3D effect. This requires more fabric, and therefore a larger T-shirt.

From Wolff, The Art of Manipulating Fabric - Consider cutting the fabric to release tension and to allow you to do even more with the fabric, eg twisting, or moving it from one side of the garment to the other.
- Colour is important but this might just be a time to choose a colour you wouldn’t normally wear, just for Christmas, or for fun. You could dye the T-shirt before you start. Alternatively sew your pleats, dye your T and then release them to get a shibori effect.
- And please share your ideas and learning below so we can all have the benefit of it.


Thank you!
Manipulating fabric – T shirt Transformation Project
I recently read an article about Olivier Saillard’s sensational fashion show, where he took cheap cotton T-shirts and transformed them – with twisting and draping, pleating and stitching – to create a new sensation.
Saillard has only come to designing relatively late in life (he is 51), having worked as a museum director. He is famous for curating the 2011 Madame Gres exhibition, and the following year creating performance art of sorts combining priceless items of dress with runway shows featuring Tilda Swinton in The Impossible Wardrobe.
Vogue explains that he was not only inspired by Madame Gres; he also located one of her old seamstresses to help him learn how to create some of her original techniques.


I felt suddenly very excited.
Madame Gres (in a turban, first picture) created Grecian inspired costumes with lots of draping and pleating. I learnt some of these techniques when I attended a course on bias drape at Morley college, mainly using very light weight fabrics.


Obviously working with silk chiffon, or creating full length evening dresses is an expensive hobby with limited value in today’s society (for most of us). What appealed to me was the idea of taking a very simple, ubiquitous item like a cotton T-shirt and transforming it into a unique and lovely item that could be worn with jeans or slim cut trousers and boots. Or of course wear your T as part of your uniform (I am still head to toe in navy corduroy!)
So here is a possible challenge you might to consider. I am going to find a couple of T-shirts (or acquire from the charity shop or cheap vendor) and see if I can create something similar but also unique.

Here are some more inspiration pictures.


The issues I am considering are
- How to use pleating, tucking, slashing, gathering and possibly other techniques like smocking to transform a T-shirt
- How the transformation might be temporary and dynamic – possibly using safety pins, elastic bands or zips – for example
- Whether to use the techniques to flatter the body (a voluminous large T can be unflattering to a woman’s body) or to create additional bulk or structure
- Creating a shape or style that needs to be worn over something else (the green slashed and orange versions)
- Putting the embellishment to the side, the back, the sleeve or the neckline will give very different effects.
- Making your own T-shirt to start with or using a T-shirt with stripes or a pattern, or in a soft, drapey fabric.
I am thinking of having this project finished by Christmas, feeling sure there will be an occasion for a unique T-shirt whatever the weather. In the next two weeks I will give more information on suitable techniques, more inspiration and updates on how I am getting on.
Care to join me for a Sewalong? #TransformTSAL
Landscape photography
I have never really understood landscape photography. Although I love the landscape, and there is nothing better than going for a walk in the woods, I have not found it an interesting photography subject. Even when the place is stunning, magnificent and most enjoyable, I haven’t ever been able to capture an image that is anywhere close to the real thing. Nature on this scale is so vast and detailed, and yet most of my efforts at a photograph are just bland and green.
With this exercise I had to do a landscape photograph for my homework. I worked quite hard with thinking about what would make a nice image. My favourite picture is the first one, below, which I have called Killing Field.
We came to this area in the Lower Woods, Badminton, as we walked alongside a small river.
For an hour or so I had come across several dead trees – fallen across the path, uprooted alongside us – bearing their roots, or invaded by fungi. Some had fallen across the river and become encrusted with moss and lichen. And I felt a sense of sorrow, and contemplated what it means to die, to fall, to rot. Of course nature demands death as often as birth and you cannot have creativity without destruction. But I will still shocked when I came across this man-made area where trees had been cut down. Of course this is not wanton destruction; the English have used the wood here for thousands of years and the wood as a whole is stronger as a result of the husbandry. But at that moment, coming across it, there was something upsetting, menacing even, about this deserted, almost sacred area. It was tidy, but there were a number of elements that disturbed me. The bright orange, almost bloody stumps; the bare, upright, truncated (right foreground) tree; the way the bodies had been laid out; the deep fissure in the old trunk; the barren grass. And the deep green young trees, all so straight, surrounding the field, looking on as if in shock.
I found it profoundly affecting, and this is what I submitted for my homework. The second picture gives another view of the same scene.


The next three pictures come to life for me through the inclusion of Nick. The small, dark figure helps give perspective to the area. The dappled November sunlight in the first shot, the scale and spaciousness of the second two, help us get a sense of how our ancient woodlands feel, when you are in them.


The third set are just trees – nice shapes, textures and wonderful colours. Apparently there are more versions of green available to the human eye than any other colour. I find these a bit magical and mysterious.


The reason why I think these photographs are successful, compared to my usual “green and bland” images is that
- I went out with an intention
- I brought my feelings to bear
- I looked for the right light (it was mainly flat, but there were occasional moments of brightness in the gloom)
- I underexposed to get more detail
- I used Photoshop to edit – mainly I increased the saturation to bring out the different shades of green, and increased the clarity of the blacks to emphasise the structure.
Christmas Presents – have you made a list?
I couldn’t find the energy for Secret Santa this year, but I am making Christmas presents!
Mainly socks.

It is possible that close family members will all end up with a pair. I am finding that socks take quite a lot of time although they can easily be combined with watching TV or listening to podcasts. At the moment we are watching Bordertown on Netflix. I got two large balls of this bright yellow yarn in the Salvation Army shop for 50p. There is quite a lot of sock yarn (4 ply 75% wool, 25% nylon) out there if you look. I got some grey stuff on eBay too.
What about making a covered book or two? This is a nice way to use up precious fabrics that are too small to use for garments but too nice to throw away. I like using African fabrics or small samples that I have been given. Here are my instructions for covered books.

Also I made some small leather purses with leather samples. I loved using my plastic poppers in bright colours to finish them off. These are useful for all those plastic cards we seem to need to carry these days, or for your ear phones which get tangled and crummy in your rucksack.

Two other nice ideas for making presents which I have never done but meant to are the oven glove or the longer thing for getting stuff out of the oven.
Again – this is a great way of using up scraps of fabric. You can stitch smaller pieces together to make a patchwork effect. Last year Esme and I used up Christmas fabrics to make stockings for the children. This involved stitching strips to backing fabric, cut into a stocking shape, then joining the two sides together with bias binding. It was quick and fun.
The other knitting project that is quicker than socks is vintage slippers.

Special Christmas Offer on Making Life More Beautiful
Finally you could send your friends or family a copy of my book, Making Life more Beautiful. I know lots of you have enjoyed it and I so grateful for the positive reviews that you have written. Here is what Aggie MacKenzie said:
“This book sings with vibrancy, richness and excitement. It’s jam packed full of brilliant ideas, practical advice and gorgeous colour. An inspiration and friend to every woman interested in clothes, whether you are a maker or not”

The book includes the pattern for the vintage slippers, details on how to make trousers, skirts, jumpers and a hat. It also has lots of advice and ideas on colour, style and life.
I don’t have many left but I do have a special Christmas offer! I will
- wrap the book in hand printed paper with a gift tag OR
- include a piece of fabric, a pattern or haberdashery (lucky dip) OR
- add a free note book, worth £3.50


I am also still offering free postage and packaging in the UK, and reduced postage for the rest of the world. Please indicate if you want gift wrap, lucky dip or note book on the “order notes” (comes up before you pay), and state if you would like a dedication or something written on the gift tag. I will dispatch the next day. My last posting date are 8th December for South America, 10th December for Australia and New Zealand, 14th December for the USA and 18th December for the UK.
Thank you for your support – I really appreciate it, and it makes all the work I put into the blog and the book worthwhile.
You must be logged in to post a comment.