


The halter neck
Here we have Princess Diana’s entry for Jungle January!

We have looked at a number of clothes that emphasise slim hips (most trousers) the legs (the shift), a curvy body (sheath). Now it is time for the shoulders and back. Nothing celebrates the shoulders and back like a halter top, dress, swim suit or gown.
What is a halter? A top that exposes the shoulders and back, often fastening at the back neck with a tie or other fastening. Because it is fastened in this way it can allow the creation of backless evening gowns and swim wear. However not everyone looks great in a halter neck as the style lines resemble a Raglan sleeve, exposing and emphasising the shoulders.
It is assumed that this style of top was invented by Vionette as it worked especially well with a bias cut evening gown. The 1920s and 1930s were the eras when a more obvious but natural body shape was allowed to emerge with close-fitting bias, jersey and swimwear designs being offered. It is essentially a sexy, revealing item and fun to use in evening wear designs. A halter neck blouse can be worn with a suit to work but it would still be quite shocking to take off the jacket and reveal a bare back.


Style advice
Halter necks have the effect of narrowing or slimming the shoulders so can work well for women with large shoulders, and are best for women who with a straightish body. One of the best halter neck wearers was Princess Diana. The style had the effect of giving some emphasis to her very slim hips and minimising the strong shoulder line. In these three evening dresses there is some gathering or draping in the skirt to balance out the shoulders – to very good effect.


Modern Make Up – an interview with Emily Manero
Over lunch I often chat with Emily. She is a capable and ambitious young colleague and I noticed her eyebrows were carefully made up. So I asked her about it.
“Eyebrows are one of the most important aspect of a made up face today” she suggested. I have never worn anything on my eyebrows, and don’t wear much make up at all. I asked to tell me more about modern trends and her interest in make up.
Why does someone young and pretty feel the need to wear make up?
To me it is like any kind of creative hobby – I play music, dance, do my hair, nails and make-up. It is pure enjoyment! Of course there is an element of transformation – enhancing what is naturally there. I do wear make up everyday, and have been doing since I was about 12. But I don’t feel uncomfortable without it – if I have been swimming for example and I go into a shop on my way home. I just like having nice nails, hair and make up.
How long does it take you to do your make up?

I would say 15-20 minutes. I am automatic pilot in the morning and I just do it as part of my daily routine. Its not always exactly the same everyday. Depending on my hair, clothes and mood I will give more or less emphasis to the make up. If my clothes or hair are very dressy, then I play down the make up – leaving out the contouring. I don’t really use colour – just neutrals and browns.

If I am wearing jeans and a jumper I might do more with my face. I use 12 products and six brushes. This is what I do:
Face
- Moisturise
- Mac Studio Fix Fluid foundation in NC15 with a Real Techniques buffing brush
- Collection Perfection concealer in Fair under eyes and blended with same brush
- Leave to work into the skin
Eyes
- Mac eye shadow in Omega to fill in brows with Mac angled 266 brush
- Real Techniques Naturals palette, light base applied all over the mobile lid with Real Techniques Eye Shadow brush
- Take the brown from the same palette and apply with the same brush through the crease (edge of eye socket and brow bone) to add depth
- Maybelline Master Precise Liquid eyeliner in black, fine line against top lashes and flick
Back to face!
- Set the face with Rimmel Stay Matte powder in Translucent over the whole face with Real Techniques powder brush (some people like a dewy finish to their face, I have oily skin and I want everything matte, matte, matte!)
- I contour with the Charlotte Tilbury Filmstar Bronze and Glow and a Models Own blush brush. There is a darker colour for sculpting (hollows of the cheek, temples, sides of the nose, jawline) and a lighter colour for highlighting (tops of cheeks, centre of nose, under brow bone)
- Bourjois blusher in Rose Ambre and I apply with the brush it came with to the apples of my cheeks

Products
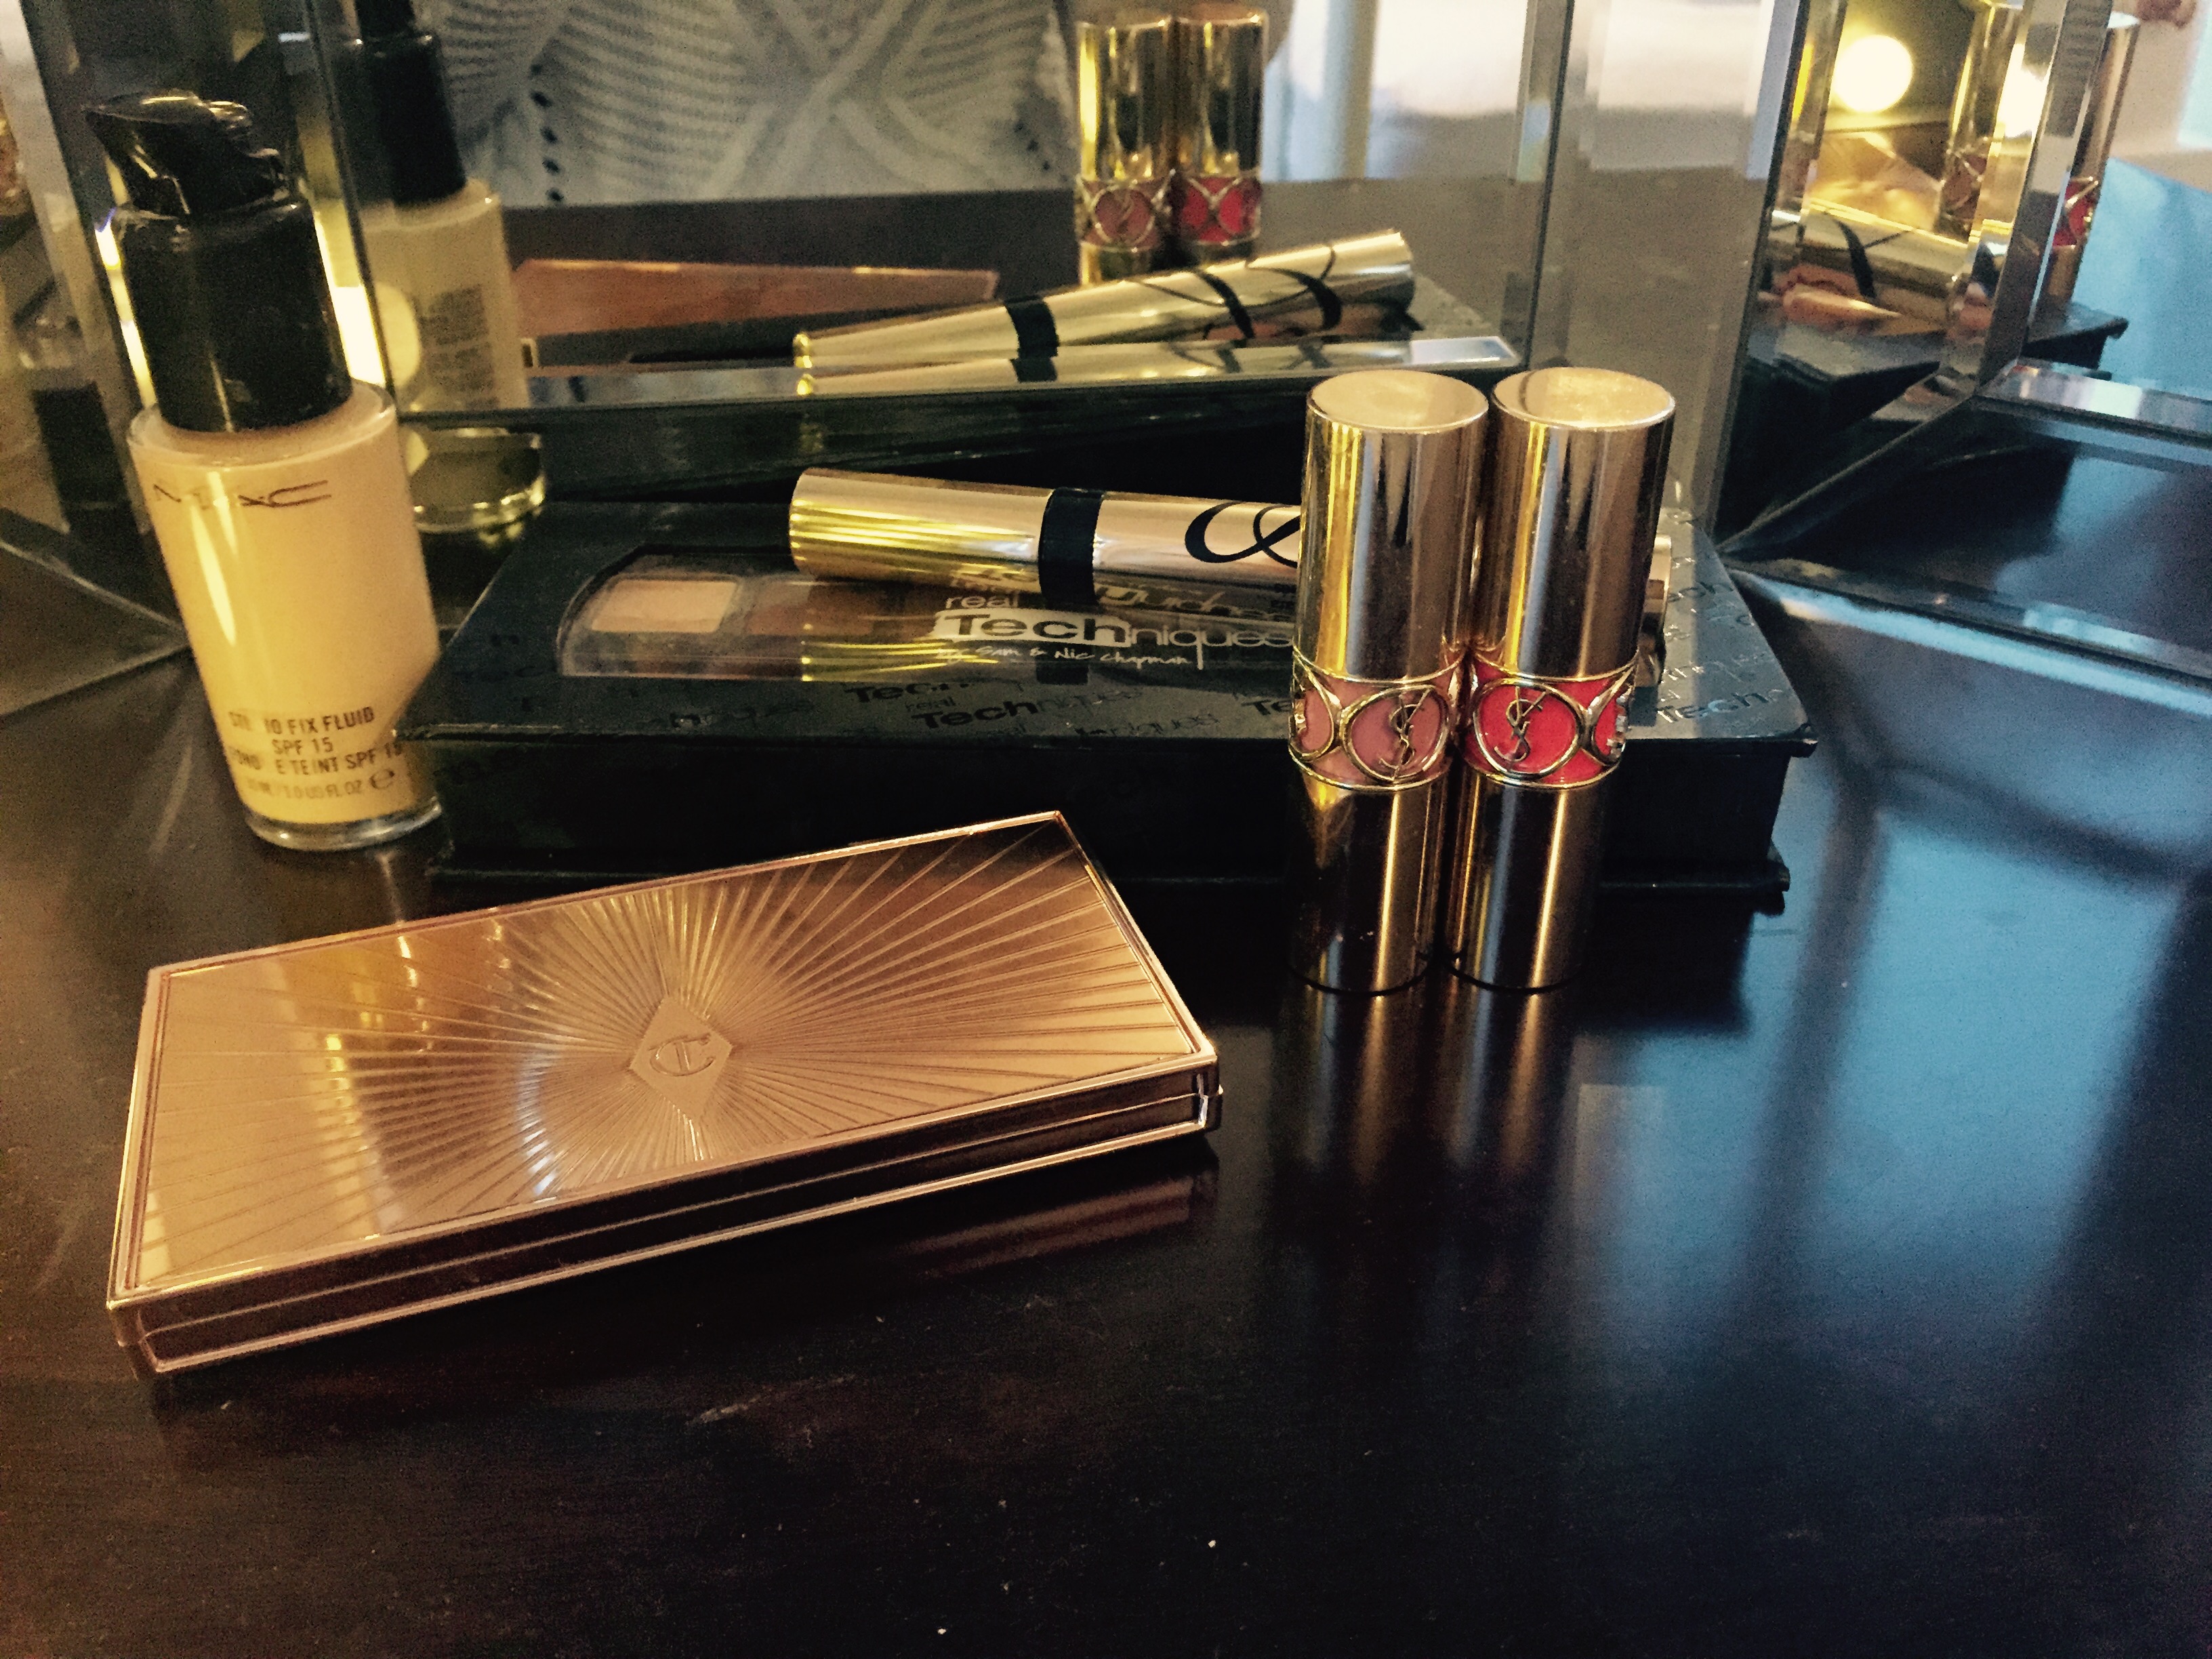
Lips
- I wear a clear lip balm, or a lip stain or a full on lipstick depending on my mood, clothes and hair. But always something.
And last but not least
- Estee Lauder Sumptuous Extreme mascara in black. I don’t know why I put this on last. It just makes the whole face.
What exactly is “contouring”?
It’s a Kim Kardashian thing! Basically it is shaping your face using shading to emphasise where light will fall, using deeper colours to sculpt and lighter to highlight You can get creams or powders to do this – and of course there are kits – contour kits. I think with Kim Kardashian there were rumours about plastic surgery – with people saying “no – it is achieved with make up alone!” Contouring can create a very striking effect – almost more so than surgery. Here is a picture of Kim, showing how it is done.

Hollywood, stage make up, the movies – I suppose make up and masks have always been part of the world of making people look different?
Yes, but there has been a backlash against contouring. High coverage make up can be like wearing a mask. I mean if you have it done for your wedding, or for a photo shoot, you might not actually be recognisably yourself. And it would be funny at your wedding if you couldn’t kiss your husband for fear of the lipstick or highlighter being upset. I think the philosophy that I have – that make up is to enhance nature rather than disguise it – is catching on. I wear make up but you can still see my skin – that I have imperfections.
Any tips Emily?
- Test the colour on your skin, getting advice from a professional such as MAC consultant
- Get a variety of brushes and use them, not your finger
- Blend your foundation and eye shadows – it can be really obvious if you don’t
- Always take it off at night. I use Simple face-wipes.
- Go easy on colour – neutrals look best for day time wear.
Tessellation Printing continues
You may remember how we had made patterns from sketches of kitchen implement, then photocopied them, and arranged the tiles.

This week our task was to use a range of materials – lino, soft cut plastic, polystyrene blocks, stick backed foam, string, rice, cardboard, PVA glue – to create blocks inspired by these initial designs. On the left of the picture you can see my three blocks. The first is cut away in polystyrene so that the background prints as white. The cut out is stuck on a piece of acrylic which helps you see through when you are printing. The design stands proud from the block and you get the effect show on paper on the right. The second one down is drawn into the polystyrene with a ball point or pencil. This is a very simple approach and it works great with the polystyrene you get with a pizza, so very easy to do at home. The effect, shown on paper, is the one where only the outline comes out in white and everything in green. And the third one underneath is my attempt to make the pattern using string. You cover a piece of card with PVA, stick the string on it, then cover the string with glue to preserve and waterproof it. Then dry it off with a hair dryer. Each block is about 10cm square.

Using the polystyrene blocks I made a pattern with the reversed out and in pattern (while my string block dried).

Eventually I printed the planned design using a combination of the string and polystyrene cut away blocks that reversed each other. It’s a bit messy but I liked the effect of the string.

My friend Hester (who also works for a housing association) is doing the Art Foundation Course and this is one of her modules. She made a beautiful hexagon print from carefully carved sticky backed foam. You can produce very fine work this way.

And Zahra (who is an architect) chose to make circles. Here is her work.


Block printing is very “primitive” – even compared to screen printing. But that is one reason why I like it so much. Examples exist from 3000 BC – it is so fundamental and basic. Just making marks in wood or another material and then printing from it again and again. I always find the process somewhat miraculous – always unexpected (the print in always a mirror image) – and as the pattern forms, somehow overwhelming. I find printing addictive – and making my own unique fabric which I can use for sewing projects is an additional motivation.
Sewing With A Plan 2015 0.13
The 1967 Simplicity 7305 Jacket

Pattern and alterations
I toiled this pattern last year in a blue boiled wool and I have worn it almost constantly as it is pretty cold round here at present, and it comfortably accommodates a cardigan or down jacket. The only slight fault (and it is almost imperceptible) is that it could do with an additional half inch or so across the bust. The pattern is for a 32″ bust so a little adjustment is in order. So, partly to show Lyn how to do a FBA, I added about half an inch at the bust. While doing this she suggested I add some more darting to make the 1960s jacket less boxy. So I added some subtle darting to the front and back of the pattern. I also decided to do a really good job on the pockets this time.
Fabric choice, interfacing, lining and buttons
I have been calling this fabric both “pink” and “fuchsia”. Fuchsia is described as a strong, purply red. My ever helpful husband swears it is Archbishop of Canterbury cloth – a left over from making cassocks for Dr Williams. I bought it on eBay and it is “Made in England”. All I am saying is that it is a strong colour. And probably not the first choice to wear as a two piece suit on an everyday basis. But as useful separates that will go with the rest of my wardrobe – a good choice. Wearing it with a purple blouse and say a light pink and lemon scarf I would look like a Fuchsia – but for the SWAP it has to tone with my turquoise silk, white, and a pattern that includes some red. And the Squiggle coat.


I followed a suggestion from Annie to grow on the front facing to reduce bulk (and save cloth) so was careful to mark both the CF and fold line with Tailors’ Tacks.
For interfacing I have started to sew in a fairly light cotton organdie. I plan to line in silk, which I hope to paint. If time is short I might use a plain, coloured lining instead. And buttons? I don’t have any at the moment. While I visited my friend Sharon on Clitheroe market last Saturday, and did buy some recycled buttons from her charity table, these are small ones for shirts – not jacket buttons.

Construction
So far I have cut out the pieces and put in the markings. I made the front darts and attached the interfacing last night. That’s it. Not a very productive week in terms of SWAP. I have been busy with Jungle January and family matters. Here I am trying to get my jumpsuit finished by the end of the month. My new sewing accessory is a great help.

I may or may not finish the jacket by next week end, although each stage is interesting and draws me along. This week I am hoping to carry out the following steps, reserving making the lining and attaching it for next weekend.
- making bound button holes
- pad stitching the collar
- making and attatching the pockets
- inserting the sleeves
- hemming the bodice and sleeves
- attaching the buttons
Men’s wear – choosing the right accessories
Most mens’ business wear is rather conservative and predictable, especially in terms of colour – grey or blue. So well-chosen accessories can make all the difference and can say that you care, that you have taste and style, and allow men to express their individuality.
Watches

Successful men, in my experience, often make a mistake with their watches. They buy something very expensive, perhaps with their bonus, in the hope that other men will be impressed. Actually these flashy modern watches are in poor taste. So long as it tells the time correctly there is not much point spending a great deal of money. If you want a talking point, or a valuable watch that is not too obvious, then consider a vintage one. Men with deep and cool colouring should wear a silver coloured watch with a black strap. If your colouring is warm, or you are lighter then a brown leather strap is fine, which should coordinate with your shoes. If you have warm colouring choose a gold coloured watch. A Swatch type watch is fine for people in creative industries, which can stand a little irony, but even then it should be a conservative one.
Belts
Your belt colour should be the same as your shoes. Simples. Make sure the buckle is in the right colour of metal for your colouring and make it discrete for work.

Cufflinks
Again, I would suggest vintage as most modern cufflinks are the jewellery which design seems to have forgotten. The “irreverent” cuff link referencing your sporting interest or Alma Mater is naff. Plain, simple, gold or silver is best – timeless or traditional.

Other jewellry
Apart from a simple, plain wedding ring in silver (includes silver, white gold, platinum) or gold (rose or yellow gold) I would say no. Certainly not anything with jewels in it. And absolutely nothing around the neck. And even if you are Prince Charles a signet ring is tacky.

Wallet
Leather, in a subdued colour, slimline.

Bag
A leather bag or brief case might be nice, although I think the coolest men just have an iPhone or similar in their pocket. The only people with big bags are travelling salesmen. Especially the expanding or wheely variety – nooo!

Pen
I feel the same about pens – they are a bit passe. However if you have one or use one make sure it is decent, not a stubby one from the bookies or any old Biro.

Hankerchief
The traditional handkerchief has not been superseded by Kleenex. If you are a business man you need lots of white cotton handkerchiefs that you launder daily. This is different to what you might tuck into your jacket pocket where you will want silk and something that coordinates with your tie. If someone is crying or bleeding, be chivalrous and give them a clean white hanky. Say “keep it!”. £1 well spent in my view.
Spectacles
Getting the right shape for your face, and the right colour can be very tricky. I have covered this topic before but am happy to help you choose a pair that suits you if you get in touch.
Hats
Hats are a difficult one with men (and women) being unused to wearing them on the whole. This means there are lots of possibilities for making hideous mistakes. The basic rule is that the shape of the hat should compliment the shape of your face. In other words if you face is rather angular you will suit a more geometric or angled shape. If you have more of a contoured face then your hat shape should be softer. Also colour is important. Never chose a hat colour that is the same as your hair or it will look, from a distance, like a bad hairpiece.
Shoes
Great shoes make all the difference. If you can buy a good English shoe, with leather soles, and the ability to be repaired, they will last a life time. You need to polish them and use shoe trees and/or bags/boxes to store them. They look good in black or brown, depending on your colouring. Match with your belt. If you do dress down Fridays at work you might wear a suede pair, or one in a slightly different colour (eg navy) but stick to elegant and and you won’t go far wrong.

Socks
Socks that don’t show your leg are best, in dark colours similar to your trousers or shoes. Unobtrusive socks. However if you have long legs, or work in a more creative industry, then coloured socks can look nice, perhaps coordinated with your tie, or shirt.
Scarves
In colder weather a scarf can make your ensemble look a bit brighter and more fun. A cashmere scarf in a bright colour looks lovely – red, pink, bright blue, or perhaps a tartan or stripe? If you have a green tie for example consider a green scarf but with a different pattern – that can look nice and pull the outfit together as you travel to work or to meetings. Obama makes it work with two shades of red.

Tessellation for block printing – really good fun!
In my printing class we started our tessellation project – what fun! Tessellation is when you fit a regular shape to itself many times, covering the space, like a tiled surface. When printing, creating tiles or doing patchwork and quilting this is a most intriguing feature of shapes. There are only three regular tessellations – squares, rectangles and hexagons. This project was really fun and if you have access to a photocopier this would be a brilliant project to do with children. I think it would be nice using a piece of A-4 paper with a simple design on it, as you could create a significantly large pattern – perhaps enough to paper a wall – very quickly.
Anyway this term we are designing a pattern that we will use for block printing.
The exercise started with drawing a kitchen implement or two on a large sheet of paper. I took in a small butter knife from Nick’s Grandma, and his ravioli cutter. One old and shapely, with a curved end and decorated handle, and hall marks. The other modern and steely, with a crenellated edge. We drew our objects, traced them, lit them with a lamp and traced their shadows, until we had a nice selection of shapes.

Next we cut out one of the regular shapes mentioned above from a piece of card. I took the square. I love squares. Using the window this created we moved it over our drawing until we got an interesting view of our drawings. This was then traced, and we rubbed graphite pencil on the back of the drawing so we could reproduce it three or four times.

Once these had been copied out in pencil we used black felt tip pens to create different versions of the design. I liked the third option the best where I had created a kind of shadow around my knife and crenelations using a wide felt tip and a series of dots. This picture was then photocopied as it was, and reversed.

We then laid out our shapes in a pleasing fashion.


As you can see it is easy to create a very cool, and rather unexpected effect. You can imagine these as floor tiles, wall paper or fabric patterns. Which is what they will become. Next week we will turn the designs into block prints and print textiles with them.
If you want to amuse yourself with making patterns try this lovely little programme.
Jungle January Jumpsuit
It seemed like a, like, totally cool idea.
An animal print “jump-suit”.
In my imagination I would turn up at the Chartered Institute of Housing’s posh annual dinner and look unique and elegant. With an ironic 80s vibe. I fear, however, that I may have made a baggy, summer weight “Onesie”. (Unfortunately the onesie is a garment I loathe. Cheap, synthetic and universally unflattering. And in terms of jokey prints and playful childishness, in the same category as the humorous tie-and-sock set.)

I enjoyed making this garment, using McCalls 7437. It was a little intricate for what can only be described as fancy dress (in this incarnation), but I enjoyed the process. The pattern was well drafted and the instructions clear and concise. The collar and rever worked perfectly, as did the continuous lap cuffs and pleated sleeves. I liked creating a bias casing for the elasticated waist. The pocket bags are caught in the same casing. The fit is good and it actually feels nice.

I do wonder if it is wearable to a serious black tie dinner, where I am in my professional incarnation. I do, after all, have some dinosaur lace which could have led to a tasteful skirt.

The all-in-one trousers and shirt/jacket ensemble has had different names historically – the flying suit, boiler suit and cat suit (Emma Peel) for example. It has veered between the practical and shapeless workman’s overall and the revealing, sexy outfit they went in for in the 1970s. I think some of the best examples were those favoured by wartime leader Sir Winston Churchill, who died 50 years ago. Although the press went with “siren suit”, Churchill himself called his garments a “romper suit”. Maybe he was thinking of Raglan and Wellington and wanted it to be called after him – a Churchill suit? He had several made for his specific shape, including one in pinstripe (see top of post). It was obviously a comfortable garment for him, (nothing tight around the middle) and he wore it on formal occasions, perhaps wanting to show he was a man of the people, a man of action, but also expressing his dramatic taste in clothes. I am delighted one of his onesies is now available for viewing at the Science Museum, alongside the original paper pattern used to make it. I hope to go and pay my respects.


I wore romper suits when I was a little, and my grandchildren wear them today. When my sons went skiing they noted that all the French kids wore colourful all-in-ones (whereas the English youth had adopted a transatlantic snow boarder/skateboarder look, usually in black).

I had some lovely stiped, stretchy towelling ones for sleeping in, that had a flap at the back for night time toilet trips (thank you for bringing this issue to my attention Stephanie).
So comfort is really the main thing with these all-in-ones. However, styled, they can make a person look long and slim as there are few horizontal lines. The all over pattern keeps the eye moving and disguises figure faults. What do you think? My daughter says NO! I say “Grrrgh!”

“Worldleaderwear” – a brief study
What is happening to our male leaders? Here are Cameron and Obama, together last week. Are they morphing into one and the same person? Their suits, shirts and ties are almost identical.(Thank you Karine, for bringing this to my attention). This dark navy suit seems to be only available in slim fit and slightly chunkier, to wear with a pure white cotton, classic collar shirt, and a mid blue tie will look nice (conservative, but caring). Americans have to wear lapel badges (which ruins the look if you ask me) but otherwise twins! They also have the same posture and facial expressions – firm and forward-looking (is that a mirror between them?)

I thought for a moment the uniform might be changing. Below is a delightful photograph from the G8 summit about six months ago. Nowadays it doesn’t matter if you are American, Russian, French, Japanese or even Belgian. You are obliged to take your tie off and go on a mass walk. If you did not know what it was this is “relaxed business” wear. The trousers may be suit pants, but not from this suit. Two of these fellows have lighter trousers but all the others have the same clothes. Especially important is the fact that the jacket must be very dark blue (Putin didn’t get the memo). The shirt must be white or very light pastel. Black leather shoes with a hint of informal. Rimless glasses. And the pin badge. There is one woman in the photograph, but sadly she is blending in with the green, green grass of home. (Can you spot Angela?) Obama leads. The Russian looks uncomfortable and is walking along like a reluctant child on a school outing.

Global power: (L-R) European Commission President Jose Manuel Barroso, Japan’s Prime Minister Shinzo Abe, German Chancellor Angela Merkel, U.S. President Barack Obama, Russia’s President Vladimir Putin, France’s President Francois Hollande, Canada’s Prime Minister Stephen Harper, Italy’s Prime Minister Enrico Letta and European Council President Herman Van Rompuy at the G8 Summit at Lough Erne in Northern Ireland
Even if you wear “relaxed business” wear, it doesn’t mean you are actually relaxed, as this picture proves. Here we have two super powers negotiating. Is Mr Putin looking at his imaginary phone?

Do you wear animal?
I, for one, am happy to wear fur – especially rabbit which is lovely and soft. I enjoy eating rabbit too, and although I like to see little bunnies running around in the country I do not feel there is any, in principle, difference between leather, sheepskin and fur. On the other hand giraffe fur, zebra or leopard is neither widely available and probably protected so you won’t be seeing it used in my dressmaking projects. However there is something very compelling about the patterning on wild animals that textile designers have captured again and again. Usually we find in nature the most wonderful, harmonious colour palettes, gorgeous colour graduation, markings which increase and decrease in scale (depending on where on the body they are).


As well as looking lovely these animals are well camouflaged which helps them to hunt effectively, or protect them from predators.
The advantages of natural skins and furs are
- they are strong and weather resistant, which is why they composed mankinds first clothes and adornment
- fur reflect light and will enhance your skin. This is really why women (when it wasn’t politically confused) used to demand “a mink coat”.
- they tend to work well with both neutrals and colours making them a good wardrobe staple – shoes, belts and handbags are almost always in fashion.
Much more affordable, and available today, is the animal print. Here are a few style suggestions:
Firstly get the colour right. Just as with your primary colour direction, there are patterns which fit the same set of definitions. There are animal prints which are deep, and others which are light, those with cool undertones, and others which are warm. There are brighter designs, and designs which are muted. Choose an animal print which co-ordinates with your natural colouring. But, in general most natural colouring in wild animals is yellowy and warm so watch out if you have a cool palette.


Secondly get the scale right. If you are petite stick to a small pattern, like a snake skin or a small leopard type print. Larger women can get away with a large pattern which will look better – the tiger and bigger giraffe patterns perhaps. And also take care where you wear it. Alot of it – a coat, dress or trousers will make a big statement – ideal if you have a dramatic personality. But if you are more a classic dresser, for example, it might be better to have use it as just one, retrained wardrobe item.


For many of us it might be better to stick to details – a scarf, handbag or shoes. Here are some nice accessories that would look especially beautiful on people with warmer colouring.


The fabric chosen for me by Demented Fairy includes white (much whiter than is shown here), black and blue, so a cool, bright colourway. The scale is medium, so suitable for someone my height and build. And I could use it on either the upper or lower half, but I have decided to make an all in one jumpsuit, as I find bolder patterns work better on me when I use them head to toe.

How to make Tailored Trousers – Part two
Here are detailed notes on constructing tailored trousers. They are provided for myself and my daughter, but may be of interest to others making pants. The first steps are covered here; this post covers waist band, fastening, hems and finishing.
Waistband
These trousers have a contour waistband for best fit and comfort in wear. I find a conventional waist band stands too proud of the body, and where we want the waist band to closely fit into the waist and take on its curve this is the best style of waist band to select. It is quite common in vintage patterns, but quite rare on modern ones, and of course virtually unheard of on RTW. If you are making a close-fitting tailored skirt, or tailored trousers, it can give you a very nice finish.
- Cut a wide bias strip for the belt. You can certainly use two strips and join them at CB. If you lack sufficient fabric to create a true cross grain waist band, you can use the best cross grain you can get. To get the right size measure the waist (or place where you want the waist band which may be a little lower or higher), divide by two, and add 1 inch to one side and two inches to the other. When you attach them the longer side matches the side you have your lapped fly coming over. Right sides together attach the two pieces, press and allow to dry.
- Now lay the waist band out on a flat surface and with a piece of chalk and a set square, mark the 5/8″ stitch line on the inside of the waist band.

Mark the waist band on the stitching line - Cut a piece of curved Petersham of the right width (I use 1″) to the length of your waist plus 1.5″ for the overlap, and carefully, using a slip stitch,sew the longer side to this line. This is the base of the waist band which will be attached to your trousers. The shorter edge will come higher up into your waist.

Sewing the Petersham to the waist band - Now, fold over the bias strip over the Petersham to form the waist band. Pin it to the ironing board in a pleasing curve.

Pin waist band to board - Once the waist band looks even, press it on the wrong side to set the shape of the fabric.

Pressing the waist band - Lining up the seam in the waist band with the CB seam of the trousers, right side together, pin the waist band to the trousers, making sure it is even and that you have the slight overlap in the right place. Mark on the Petersham, using a washable pen, where you exactly want the end of the waist band to be. This should be lined up with the underlap and extend about an inch with the overlap. Also mark exactly where you want the hook and eye to be. Now baste the waist band in stitching along the stitching line.

- You will need to mark with a tailors tack or chalk where the two sides of the waist band meet. This is to ensure that the front of the trousers look smart and professional. The longer than necessary zip is still visible.

Mark the position for the waist band seam at the lapped edge - Now that you have basted the waist band in place check it looks nice and even and ends exactly where you want it to. You may wish to slightly trim the length of the Petersham at this stage.

Checking the basted waistband - Stitch the waist band to the trousers. Now bring the zip pull down to just the right position on the trousers, trimming off the excess at right angles. Trim the seams fairly aggressively but safely, leaving the longest piece closest to the outside of the garment.


Hook and Bar
- Now we want to put in the bar for the hook to attach to. The spot is where the extension meets the waist band. Your hook with extend just a tiny bit beyond the edge of the fabric so the bar must also be placed just slightly beyond the overlap. If you are using a bar which goes through the cloth (recommended) you need to put it after you have sewn the waistband to the trousers permanently. If you use one which is stitched to the waist band you should do this at the end of the construction.

Attaching the bar to the waist band - T he bar is also best attached by undoing the short end of the overlap for a few stitches in the middle withan unpicker, to create a slot into which you can push the extension of your bar. This creates a very neat finish, and if you do it now, you can stitch it to the Petersham neatly and firmly before you close up the waist band.

attaching the hook between the layers - Now you can finish attaching the waist band. Bring the inside piece down over the Petersham, ensuring all the seam allowances are pressed up wards and caught inside the waist band. You can either turn it up and inside, or to give a flatter finish you can leave the edges raw (as it is bias it will not unravel). Either attach by hand or over stitch in the ditch on the outside of the trousers.


Hemming
- Try on the trousers and decide where you want the hem to finish. On this pair they are quite short (7/8th length) to show the ankle. Pin them all round to mark where they will finish. Take them off carefully.
- Measure the depth of the hem at specific point and replicate this on both hems. Pin them up. Press lightly without squashing the roundness of the leg, using the tip of the iron.
- Turn inside out and hem on the overlocked edge, picking up just one or two threads each time, using a neat slip stitch.
- Press again, again with care. A damp linen cloth can be used to ensure the crease is nice and crisp. Allow to cool.
- Remove the tailors’ tacks, the basting at the pockets and any other threads.
You must be logged in to post a comment.