


How to make pom poms and pom pom crowns
On Saturday I explained how to do Frida hair and how you could use flowers and natural plant material. The main problem with using fresh flowers and leaves is that the rarely last longer than one day. So the pom pom crown is a great way to create something that looks like a floral head-dress. By using lots of different colours and weights of yarn you get some of the effects of flowers. If you want the floral look create some different shades of green pom-poms.

I suggest you make quite a few pom poms first and then arrange them almost like you might do a flower arrangement, using five the same, then adding three of a couple of others, and then one special one. Or just bring similar colours together with less of a contrasting colour. This sort of arrangement is probably rather an instinctive thing – just keep adding until you are happy with the look.
How to make small pom poms
Making pom poms is quite good fun and produces something very pretty. But before we do that would you like to watch another video? This one is a Ted Talk.
Ingrid Fetell Lee argues that round things, bright pops of colour, symmetrical shapes, abundance and multiplicity, and a feeling of lightness or elevation all bring us joy. Confetti, balloons, smarties, rainbows, fireworks, bunches of flowers, bubbles – and pom poms!
What could be better than a pom pom crown?
- You can get a tool to do this. I have a Clover pom-pom maker which I would recommend, though noticed something similar at a good price.
-

Pom Pom maker When using these makers you can mix up the yarn by using it double to get a nice speckled effect, or use it in blocks which is also rather pretty. A tip is to use a stronger yarn for the tie (eg acrylic) in the same colour as your hair band as you can get a nice strong finish, and when you tie them to the hairband. Also you need nice sharp, small scissors.
- You can also make one yourself from two cardboard rings, with a hole through the middle, and are best made with a bodkin as you need to take the yarn through the middle. These which tend to disintegrate each time you make one so are probably best for making just one, or a custom size
- There is trim with small poms poms attatched
- You can buy machine made ones in one colour or multi coloured, and attach these with glue or stitching
- With the children I used the fork method which made nice, small pom poms. These are what I used to trim my white tray cloth huipil
Fork Method
- Using a small, slim fork, wind yarn around it making it fat and narrow, leaving space at the top and bottom of the tines

Wrap yarn round fork, tie, cut, fluff up - Use strong thread (I used linen) to tie the band of yarn tightly around the middle, coming in between the second and third tine
- Tie tightly, slide off the fork and cut through the loop, taking care not to cut the thread tie.
- Fluff up and trim. Use the linen thread to sew it to fabric or your crown
I used the pom poms in various sizes and attached them to padded velvet Alice bands. I got these on Amazon for about £6 including postage. I got a pack of three including one in black, so I crocheted a cover for it in beige that blends with my hair.
Making the crown
The padded Alice band provides a bit of bulk, raising the pom pom flowers off your head a little, but this also works fine with a small plastic or covered Alice band, or even a ring of elastic. I think you could use braid with a bit of elastic at the back too, although I didn’t try it.
Put a selection of pom poms together. I made three using three different colour schemes. One is blues, white, pink and red. One is green, blue and pink. And my final one is pastel and light shades. I also included small, medium and large pom poms. Incidentally you can also include small knitted or crocheted items here. I had two crocheted fish made by a friend, and some granny squares, and the poms poms I cut off a Cambodian bag. You can also include fabric flowers.

When arranging them a good look concentrates the flowers just on one side, but of course “more is more” in this project so you can more or less cover the head band with the poms poms. They mainly sit on top of the Alice band, but you also need some coverage towards the front, and possibly also the back, so use the smaller pom poms for this purpose.
The Dress Like Frida Sewalong Week 5; Hair and Head-dressing
One of the defining features of Frida’s look is what is happening on your head. If you are lucky enough to have long hair part it down the middle, make two long plaits, including ribbon in the mix if you want more bulk, then bring them round to the front and pin to your head. Then decorate with flowers or just leave it simple.
We maybe familiar with Iberian hair styles from our “Brits go to Spain” holidays. I used to love these embroidered post cards and find them very evocative. The Spanish dancers often wear their hair towards the back of the head with flowers at cheek level. The dancers’ thick, dark hair is glossy and elegant. I have had hair envy from that time and place (maybe we always want something we cannot have!)

Frida usually has a centre parting although in some shots she has her hair pulled back from her head into a top knot. In most of the other photographs her hair is pulled towards the back first. Here is some Frida inspiration – I have done a second Pinterest board.


Hair
Although there are some loose hair styles generally Frida generally wears an up-do, often with some plaiting and usually oiled to give the glossy look. The simplest look, if you have long hair, is to plait some ribbon or fabric into your hair, tying the ribbons in a fancy bow at the front of your head.
If you have African hair you can certainly do this look but you may need some variations. If you have scant or short gringo hair you may have to build up the look with a cushioned hair band, or crocheted “hair”, or use an Alice band that you can attach flowers or pom poms to. Consider a centre parting, plaiting or anything that gives sufficient bulk to balance the long skirt, wide tops and shawls. It is easier to wear a head-dress if you create a base with your hair first.
Week 5: The Headdress
The simplest way to create a Frida look is to add fresh flowers to your natural hair. If your hair is fairly thick you could just tuck a flower into it. Slightly more permanent is a hair comb, to which you attach fresh flowers. I used this method for the marriage of my son to beautiful Brazilian girl Bianca. I had a crown with cornflowers and little pink flowers for myself and combs for the Brazilian ladies and Esme. I tried to match the flowers to the colours in everyone’s outfits. It was a nice approach, much prettier than hats or fascinators.

I made a crown for Esme’s wedding too. Basically this involves making a circle that is roughly head shaped from wire. This is wrapped in florists green tape. The individual blooms and leaves are pierced with narrow straight wires, twisted and then arranged on the crown and the thin wire is wrapped around the halo. These wires and ends are then re-wrapped with the florists tape so it is comfortable and safe.

For this project I tried to use what natural plant material I could find in the country, free of charge. I went out with a pair of scissors and a carrier bag and three little helpers. We noticed that most of the plant material was green; that purple, yellow and white were the key colours; that some of the best shapes such as thistles and teasels were “spikey” and therefore likely to uncomfortable, or “fluffy” and probably unstable. We looked for wood that was flexible enough to bend into crowns and used thread, wool or fuse wire to hold it all together.


I was very impressed with the work the girls were able to do. They made wearable items with very little help. They shared their flower collections willingly. All of them wanted more colour (me too), so we decided to make some pom poms from those really small pieces of left over yarn that are good for nothing else. We used the fork method as it makes the nicest, smallest pom poms which are ideal for little girls head-dresses (I will explain how next week).


I love the natural look of all these crowns, with or without added pom poms. Of course the down side is that they don’t last very long. So on Tuesday I will post on how to make more permanent crowns with non-perishable material, focusing on the pom-pom. Also have a look at what Fadanista Sue has done with her marvellous knitted roses. She also shows how to make a headband from an old T-shirt.

Making Life more Beautiful
 About 100 people attended my book launch. There was lots of time to meet new people (all photographs are by Laura Shimili).


There was plenty to eat. Samosas, two types of Iraqi bread buns (one vegan, one vegetarian), lemon cup cakes and a huge chocolate cake. The food was laid out on 6 yards of Ankara (African print) fabric.


There was a bit of book signing. Just my name or a dedication or something inspirational.


There were short speeches from Gus, and then me.


This (more or less) is what I said.
Making Life more Beautiful is a critique of what is normally meant by beauty – young, female, tall and thin, invariably white, airbushed, contoured, straightened and largely formulaic – avataristic.
This book provides a different aesthetic. For me beauty is varied and diverse, individual, natural, authentic. And confident.
As I took pictures of my models – from 0 to 90 – I looked at their faces, their eyes, their figures, their lines, their hair with interest and empathy; making them feel confident and valued rather than judged or pulled apart. This is the philosophy of the book.
The book is also about creativity. From our ancestors collecting colourful pebbles or wild flowers and arranging them artfully, or making elegant pots or tools, humans always go beyond necessity to produce beauty. Making the clothes that we wear, or painting, or cooking, or writing poetry – we all have this urge to make life more beautiful. My book encourages, inspires and celebrates this. By making textiles or knitting jumpers we can experience a deep sense of satisfaction that usefully antidotes the more toxic aspects of modern life.
As you probably know I wrote this book, edited it, and I am afraid I proofread it. I made the clothes, found the models, took the photographs, laid out the book, published, launched, promoted and sold it.
My friend Barbara the midwife regularly complains about the demanding, self-centeredness of the average pregnant women. In the act of gestation, many an author is the same – self-absorbed, fixated and unable to focus on other people’s needs. My husband bore the brunt of it, and I now understand why so many books drip with spousal gratitude.
I admit I was not easy to live with during the six months I took to produce this book. Every weekend, plus Christmas and Easter, were dedicated to The Book. My daughter Charlotte and I spent three full days – over the May bank holiday – getting it finished, and it was as if we had given birth. A huge relief when it was done, a sense of pride, and an independent existence for something that was once just an idea. But Nick, having walked the dog and cooked yet another meal, was just glad it was all over.
Making a book is essentially a solitary activity; like many things in life – it is down to you. Denis Healy said to write a book you need a sheaf of paper and a large tub of putty. The paper is obvious but the putty was to stick your backside to the chair. Then you have to dig pretty deep and not everything you find is admirable or generous. The most profound finding for me is just how much we need our families and friends. And how important the sewing community has been for me. All work is team work and I have had so much help support from my family; my teachers and guides; and of course the dozens of people I have met through the internet who have become such good friends.
What makes life beautiful is not so much what we can buy, but what we are given, and what we can give: kindness, love, generosity, understanding, openness of heart and mind, friendship, community, and support. Thank you for coming tonight and for supporting me.
And there were four workshops, which I will report on in future with some information on how to do it: how to wear a gele, eye make up, making slime, and origami and wrapping paper. Thank you to everyone who was able to come along. A number made a special effort coming from the north and midlands, and some from abroad (Rwanda and Switzerland). Some were long time blog readers who I met for the first time, and everyone was kind, generous and engaged.

And let me, finally, introduce you to my fabulous photographer, Laura Shimili Mears.
As a beginner photographer (next term Nick and I are signing up for the intermediate course) I know just how hard it is to take photographs at indoor events. She did a great job.

The Dress Like Frida Sewalong Week 4 – The floor length skirt
Week 4: The skirt
Frida wore alot of skirts, and they are one of the defining features of her look.


Undoubtedly the choice of a long, floor length skirt was in part due to Frida’s desire to cover her legs – one was underdeveloped due to polio. But she also chose a version of Mexican national dress. Frida was about 5″ 3″, with a beautiful, shaped figure. She has a nice waist, and often she tucked her tops into a waist band. However as she frequently had to wear a corset to support her back she also wore her top out, and I feel this is the more identifiable Frida look.
I have made four or five long skirts for this challenge, and have been wearing them constantly, especially during my annual leave. I have enjoyed the experience. Here are a few reflections.
- They are very quick, easy and satisfying to make
- There is no waste. Also the skirts can be unpicked and made into something else at a later date.
- Many have a lower flounce. You can achieve this look with a longer petticoat underneath a knee length skirt or attach a separate section. Just gather up a longer, shorter section and attach to the hem.
- It is nice to wear a long skirt, and it swishes around your legs in a pleasant way
- You may worry about looking like a hippy or an Edgware Road beggar woman, but you will actually look tall, strong and beautiful
How to make a Frida skirt
I have three methods which you might like to consider. None needs a pattern, and the only measurement you need is your waist. You can make the skirt with relatively little fabric, but if you are short of fabric consider the two part skirt with a large flounce in different fabric. If you have lots of fabric a full, gathered skirt is nice and dramatic.
Elasticated waist
This is the most basic skirt, a “beginners project”, but an utterly satisfying way of wearing a nice piece of cloth. I timed it – these skirts take about ten minutes to make. I used the selvedge for the top and hem. You sew the fabric into a tube (using a French seam is even better). Press open. Sew up the hem on the machine (or by hand if you want finesse), and press. Now make a folded down a channel at the top, leaving a small opening, into which I threaded 1cm wide elastic with a big safety pin. Stitch the elastic together on your machine. The maroon silk blouse was made for Sewing with a Plan a couple of years ago, using McCalls 7938 and some artificial sweet peas.


Pleated into a waistband
This pattern is in my book, Making Life more Beautiful. It is a no-waste skirt (all of these skirts are no waste). You insert a zip into a tube of fabric and pleat it into the waist band. I used a lovely piece of white linen that I dyed with Indigo. Instead of hemming it I used a lace edging, stitched with a narrow satin stitch on my machine. I am wearing it with an embroidered blouse I made some time ago. I enjoyed doing the embroidery.

Gathered into a waist band
The final skirt is the most sophisticated of my skirts, but it too is very simple. I wanted this one fuller, so tore my fabric in half and joined it together. This gave me an opportunity to add pockets. I dyed this fabric too, again with indigo. I tied lots of chickpeas into the white cotton, in three columns. This took forever. I haven’t used the fabric before as it felt a bit precious. I used it all so it is nice and full. For the belt I used a piece of yellow linen that was left over from my painted huipil. The green huipil is made from a piece of silk I spattered with batik wax and did a few doodles. It’s just the same pattern as I used before.
If you want to make this skirt, just cut out four pockets pieces (use a pattern if you have one), join them to the side seams at the right position, sew up the side seams of the skirt. Now you have a tube. Divide at the CB, insert a zip and complete the seam. Put two layers of basting stitch in the top of the skirt, pulling it up to your waist measurement plus a centimeter or two of ease. Make a waist band that fits your waist plus a little ease; mark where the side seams and CB and CF will go. Ease the skirt onto the waist band. Baste by hand and then machine stitch. Finish the waist band by hand and use poppers or a button to close.

A couple of other ideas
A few of the #DresslikeFrida team believe that a full, long skirt will not flatter them. I am not sure I agree. But here are a couple of other ideas you might consider;
- If you have slim hips but not much waist consider a pencil skirt and attach a flounce, so that you get a neat look around the waist and hips, but still lots of drama
- If you don’t care for the hippy look try shorter skirt – whatever length you like – but as full as you dare
- If you have short legs, compared to your torso, you will probably want to tuck in your huipil
- You could use a 1970s petticoat pattern.

- Use a textile printed with Frida motifs and just make your favourite skirt or dress shape


- And then, of course, there are trousers! The last few weeks I have been wearing my huipils with shorts. Ideal over swimwear or gym kit on holiday.


What sort of skirt are you planning to make? Which styles suit you best? Are you going to use a printed fabric or something plain?
The Elizabeth Zimmerman seamless raglan knitalong
Finally the Elizabeth Zimmermann seamless raglan jerseys are finished, sewn up and put on. Even if our models are sweltering (Michelle) or chilly (it’s winter in Perth), they look amazing and I think this has been a very successful project for us all.
Let’s start with Fadanista Sue who produced a stunning sweater. That dark grey with the orange, red and brown is such a gorgeous combination, and one that utterly suits her. She is a highly competent knitter and you can see that her sleeves exactly match the bodice. Her borders are garter stitched and it really looks so nice with her slim denim skirt giving a nice urban look. Sue is incredibly social and really helped the knit-along along. Thank you.

`Next up is a summer version, in cotton yarns, from Chris (@saiddoneChris) in Southern Germany, where the weather is often very nice in summer time. She did an inside out version with the back of the stocking stitch showing. This beautifully reveals what happens when you stripe a sweater – you get what looks like a running stitch above and below the stripe. I love this effect. Her soft, light, cool colour palette is absolutely perfect for her light cool colouring and the neck-shaping has worked very well. Also short sleeves are a huge sucess. I like the way she bordered the neckline in mauve and the sleeves in white.

Kerry (@Kerrysview) in Melbourne is a ferocious knitter and very skilled she is too. You may remember her EZ yoke jumpers with their lovely Icelandic pattern. I shamelessly copied her. I really love this version with its super pockets! Yes pockets. I want a jumper with pockets. Of course the Australians lead on the pockets front. Also the restrained palette is very nice – I love black and grey together. Making the jumper a little blousey has resulted in a slight dropped shoulder look which is very attractive, don’t you think?

Michelle provides us with a back and front view, so we can appreciate her lovely knitting. That dark red really brings the turquoise to life doesn’t it? I love the plainish sleeves with a nice band at the wrist. And the trousers Michelle made from Winifred Aldridge. I tried it too and the pattern is pretty reliable and fairly easy. Michelle also did a great sweater for the colourful yoke Knitalong last year, and I was so pleased to meet her in the flesh at my book launch. She is now on Instagram as @grannyinstitches.


One of my favourites (how can I say that? – I really love them all!) is made by Courtney a lawyer who lives in America. She uses a lot of black (and goes by @blackyarns on Instagram), and this jersey is predominantly black. But the use of lots of left over yarns, mainly in deep colours, is stunning and looks like seams of minerals in a coal face. Also she has gone a bit off piste with the sleeves (hurrah!) and attempted a V neck. Such a striking variation is way above my pay grade but it does show how very flexible this pattern-free approach to making knitwear really is.

And finally we have Shell, another Australian. Shell has recently been having stem-cell treatment and had lots of time in hospital (poor thing) but is definitely on the mend now. She lost her long, curly hair, but her reddish-grey crop is beautiful and these soft turquoise and grey yarns, complemented by a strong red stripes is so harmonious with her warm, light colouring. This photograph makes me especially happy as an image of strength and natural beauty despite the challenges she has faced. Very well done Shell. You are amazing.

And finally my green one. Now completely woven in, washed and worn.

I know there are a few more in the works and will do a second post when the others are done (no pressure) I have a second one on the go too, which is proving to be a bit of a disaster. I have managed to loose two balls of wool so it is taking an unplanned turn….Oh well, that is the unpredictability of craft.
The Dress Like Frida Sewalong Week 3 Embellishment
A Quick Huipil
Some people have finished their Huipil already! Old friends Sue S and Lara and new friends Raquel in Taiwan and @rowinggranny – go and have a look at our #dresslikefridasal hashtag on Instagram, Well done!
On Tuesday I provided my huipil pattern which fits just about everyone. Here is a another even quicker way to make a Huipil, with no or minimal cutting out, two or three seams and hardly any finishing.
Aquire a nice old scarf. If it is longer than it is wide it can usually be folded over, and a head shape cut into it. You have to finish the neckline, or line it as I described on Tuesday. Easier still, is if you have a large square scarf, or even better two the same or sufficiently similar to work together. Sew them together at the sides leaving arm holes (about 10″/25 cm depth), and join them at the top for the shoulders, leaving around 10″/25 cms for the head. This doesn’t need lining, but you may wish to wear a T-shirt or camisole underneath.
Embellishing your garments
Lara mentioned, via Instagram, that the shapes are simple – what makes the difference is the embellishment. Or the fabric you choose. While I focus on the embellished Huipil here you might have a plain huipil and embellish the skirt, rebozo (shawl) or other accessories, such as a belt.
Here are some ideas:
Applique, attached braids or other panels

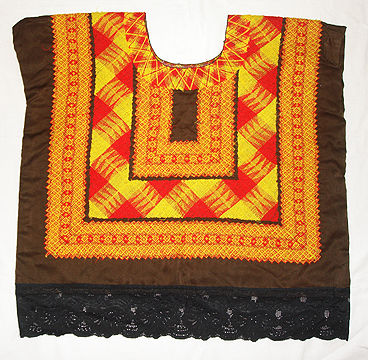
Many original Huipils have contrasting fabric, ribbons or braids appliquéd in a geometric pattern. Here the neckline is bound with the same fabric, probably cut on the bias. I noticed that in many cases the appliquéd panels are red and yellow, creating a nice bright effect.
Embroidery


The most beautiful Huipils are embroidered, generally with floral motifs. The bright colours used in Mexican blouses are very attractive and on a white (or black) background they pop. In the photograph we see Frida wearing this top, with what looks like fly-button cords. Mrs Mole adds: “This seems to be the perfect project for ladies who have embroidery machines that have built-in big flowers that have never been tried out.” That’s a challenge.

Equally the black embroidery on a white ground is very dramatic. You could copy these motifs. This tunic length is also very attractive and easy to wear. If you plan to do some hand-embroidery on your huipil it may be worth considering your own embroidery traditions. I found a lovely book in the charity shop last weekend featuring Irish white embroidery, known as Mountmellick Work. The book included patterns for splendid plants like dog rose, blackberry, honeysuckle, forget me not, daisy and shamrock. How nice it would be to do an embroidered Huipil based on these patterns – either sticking with the original white work, or making them explode with colour. The author Jane Houston-Almqvist writes: “The designs are often quite large in scale – so large, in fact, that if they were worked in colour, the total effect would be garish and vulgar.” (p25) I find this warning rather amusing. In the UK we tend to have small, delicate flowers in soft colours, and many of us have complexions that are soft, washed out and delicate too. In hotter climates the plants are strong and showy – orange, red and yellow with big stamens and huge waxy leaves. And local complexions are darker and more vibrant, and strong sunshine makes the colours sing. White work and pastel colours suit light Celtic or English skins. But the Mexican palette is so beautiful and attractive. Frida lived in a blue house. Part of this challenge is to come to terms with how we feel about colours which may look “vulgar” to some (but to my eye they look exciting).
Attach lace, hand knitted (or crocheted) braid or already embroidered fabrics
My first Huipil was made with an amazing piece of Chinese embroidered silk, from an old skirt. I have had it for a long time – I bought it from the Royal College of Embroidery as it was in poor condition and not good enough for them to keep. It was not a full skirt and although I had hoped to turn it into a skirt it is not really ideal for such a use. At the exhibition I spotted that Frida had a Chinese skirt. She bought this in San Fransico’s Chinatown, and used Chinese embroideries on her built-up boots and prosthetic leg. So this was my chance to use a textile at once Frida-ish and at the same time something I felt at home in. I cut away part of the red central panel to allow my head to pass through and zig-zag satin-stitched the edges (like you might do with lace lingerie). The lower neck edge (the same at the back) was just turned in and hand sewn.

Painting on the fabric
I used a small piece of yellow linen for my second Huipil and drew stylised “tropical” flowers on it (rather than my traditionally English roses, peonies, sweetpeas, foxgloves, and hollyhocks. Initially I was planning to embroider them but I thought painting would be quicker. And it was! I was able to use colours that I have in my own palette, but I think I achieved a bit of a Mexican feel by using shading, and sticking to a bright colour palette.

Below is a proposed “Mexican palette”.

These are colours used in Mexican embroidery, and in the interiors of homes. Much of the vibrancy comes from counterposition of pink and turquoise, brick red and bright yellow, red and green. When you are working out how to embellish your Huipil or other items the use of two or three strong, bright shades could look stunning.
Are you going for a plain, or ornamented huipil? Anyone doing a slow, hand-embroidery project? What about cutting out flowers from printed fabric and appliquéing onto a new background? Anyone incorporated knitted or crocheted detail? Let us know how you are getting on.
The Dress Like Frida Sewalong Week 2 How to make a Huipil (and a giveaway)


This beautiful Huipil, made in Mexico by skilled artisan craftswomen is available from the Victoria and Albert museum for about £300. I believe this represents a fair price for the maker, transportation and other costs, and obviously a good mark up for the V&A which is one of my favourite charities. They write “This huipil is made by master artisans in Oaxaca, Mexico, whose knowledge and skills have been passed down from generation to generation. Crafted from a combination of satin and cotton, the fabrics are woven and embroidered by hand.”
If you want to see how this work is done there is a charming and very interesting film available. I am most grateful to Helen from Cut it out, Stitch it up.
I loved the caring and prayerful way the artist approached her work, pouring love into each creation.
We are going to make our own Huipil; a tunic traditionally made from rectangular pieces of fabric with machine stitched geometric panels, or with hand embroidered intricate floral designs.
As I mentioned last week, the V&A have supplied a free pattern! Thanks to Lisa and Trish S for bringing this to my attention. And thanks to Sue Stoney who has made it up. The instruction as well written although I don’t love the methodology for finishing the garment. Also if you are planning on several versions it may be worth your while to print the pattern.
Personally I wouldn’t print off a paper pattern, stick it all together and cut it out – in three sizes. The whole nature of folkwear and traditional garments is that this is an oral tradition, based on using fabric you have woven at home. Even the size is unspecific – it fits everyone! There probably is a version for little kids but it is roomy and will fit the average woman. Our western tradition of printed paper patterns, provided in different sizes, to some extent deskills us.
Week 2: How to make a Huipil
How to make a Huipil (or a local version thereof). Or a simple, square top.
Although the Huipil is worn throughout Latin America something very similar exists in most cultures. It is the sort of top anyone would make if they wanted a garment for the upper body. You cut a hole in a rectangle of fabric and put your head through it. You may sew up the sides. Or not (poncho style).
Last week we gave some consideration to the overall style and colour of our Dress Like Frida outfit. Today we are going to cover the blouse, or if you prefer tunic, or dress. The length is up to you. On Frida the blouse was generally worn over the skirt and it came down to about the hip, but occasionally it was tucked in.
Fabrics suitable for a Huipil
Sweaty knitter explained that traditionally the fabrics for these items would have been made with a backstrap loom, which I had never heard of. Here is an interesting blog which explains what the backstrap is, and explains how these small, portable looms are used.
I would suggest a good quality closely woven cotton, linen or silk for your top. Patterned or plain as you prefer, with the option of using lace, braid, embroidery or any other trimmings. Use this as an opportunity to work in a colour that you love or use items that have meaning for you eg vintage fabrics, hand-dyed cloth, old sheeting, pillow cases or table cloths, handmade lace, faded or patina’ed fabrics, material you bought on holiday.
This simple white linen Huipil includes a tray cloth hand-embroidered (probably) by my maternal Grandma, in typical English colours – pink, blue, lemon and a little bit of green. The scalloped edges are finished in green blanket stitch. I hemmed the huipil with dark green blanket stitch (just seen) and made pom poms in a similar colour palette. This top, despite the fullness (and the tunic length) is very comfortable and nice to wear at home, or over gym clothes as I cycle to the gym or pool. There is something very freeing about putting a garment on over the head with no fastenings.

How much fabric do I need?
The finished measurements for the genuine Mexican Huipil’s, sold by the V&A, are 27″(68.5 cms) across, with a length of 24″ (61 cms). (You do know that I carry a tape measure in my bag AT ALL TIMES don’t you?). Obviously the fabric needs to be double, so you can have a front and back. In the diagram below you will see that a Huipil is made with one piece of relatively narrow fabric, made on a hand loom, folded over, requiring no shoulder seam, using about 122cms of fabric. This works well if your fabric doesn’t have a direction (in terms of pattern or weave.

With wider factory produced fabric, to avoid waste I suggest the best thing is fold your fabric selvedge to selvedge and measure the width you want (ie somewhere between 60 and 75cms). The length will be half the original fabric width. My yellow linen has a width of 140cms, so the length of my huipil (before hemming is 70cms). Folded the whole thing has a square appearance. (The fold is at the top and the selvedge is by my feet)

Lining
You don’t have to line your Huipil, but you get a nice clean edge if you do. Simply cut a piece of lighter fabric for the lining exactly the same size as the huipil, press right sides together. Draw the desired neckline (see below) on the lining and stitch the two fabrics, right sides together. Press, cut out the head hole, close to the sewing line and turn through. Press nicely making sure the lining is to the inside. Now use the “buritto” method (how appropriate) to enclose the two side seams, leaving the hems open.
If you don’t wish to line your Huipil stitch narrow hems along all the raw edges. This is the easiest way to finish the blouse. Once it is embellished you just sew up the side seams (and hem if you wish, or rely on the selvedges).
I am copying this method from the Huipil’s I saw at the V&A. The side seam is slightly bulky as you are sewing two finished edges together. But as it is not a close fitting garment I don’t think this matters.
How big is the hole for the head?
I used some calico to try to guage the right size of hole for the head opening. For me a depth of 12cms, and a width of 20th is perfect. The 12 cms are measured so that 7cms goes to the front of the body and 5cms goes to the back. I choose a square neckline as I have an angular face. If you have a round face then it is likely that a rounded neckline may be more attractive on you. The shape in Frida’s book is squarish, with rounded corners. Draw the shape you want.

Embellishment
The idea is to do the embellishment before you make up the Huipil, so it may be a bit illogical to give you the instructions for the huipil before covering embellishment. However you may want to make a plain one first to get the dimensions right before you invest lots of time with your embellishment. I will deal with the various ways to customise and embellish your Huipil next week.
Do ask any questions below, and share what you are doing. Use the #Dresslikefridasal hashtag if you are on Instagram so we can all see what others are doing. Thank you!
Giveaway – finally if you would like to win a free copy of my book Making Life More Beautiful hop over to Diary of a Sewing Fanatic and leave a comment. If you are chosen by Carolyn I’ll send you one!
Do you dress Casual? or Scruffy?
Karen wrote to me recently (and I have reproduced her letter, slightly edited, with her permission):
As a tall woman in her sixth decade, pale skinned, blue eyes, white hair who is reluctant to wear much makeup, on the slim-to-thin side, following your advice on color and dress/clothing shapes has been so useful. My transition out of dark suits is complete! I donated all of them, and my closet has much more color.
But something happened that puzzled me … I recently went to a neighbor’s 77th birthday party (more a late afternoon tea) where the other ladies present made such a fuss over how I looked – I found it more than a little embarrassing. The food was elegantly presented, wine was served, we ate on one of the patios in the host’s lovely garden, etc. That evening I mulled their reactions and tried to understand why the fuss over how I looked.
I had worn a sleeveless red linen dress with a cropped black knit silk 3/4-length sleeved cardigan, bare-legged, red clogs, a beaded bracelet, simple silver earrings and only mascara and a dash of red lipstick. I wore my hair twisted up and held with a clip. I wasn’t “dressed” up – I certainly wouldn’t have worn it to a wedding or evening dinner party but I had put a little though in. BUT most of the other guests were wearing clothes they could have gardened in. I have noticed the same thing when out shopping.
Anyway, it all made me wonder how “casual” morphed into slovenly and why it is so accepted. (Of course, I recognize that Brits may be more formal than Americans.)
Are you all imagining how nice Karen would have looked in her red dress and lipstick with a little cardi, her hair in a twist? And clogs! That is an interesting feature and if I had been at the party I am sure I would have admired her footwear. I have been thinking about her question for a week or two and I wonder what you think? I do believe that people should be absolutely free to dress as they prefer, but I like to dress up a little and I like to look at people who have taken some trouble with their appearance.
Here is a red sleeveless dress that looks quite smart with beige heels – probably for an occasion.
Any item can be dressed up or down. With summer sandals or trainers (or even clogs) this dress would be different. With a chunky belt and thick tights it would be suitable for a weekend outing. With lively jewellery or cardigan it would be nice for an informal evening event. For work I would put on a jacket.

For me the answer lies in the difference between under and over dressing. I discuss this in my book as I think it is a challenging topic, especially as many of us have plenty of clothes and spend a considerable amount acquiring even more. There is also the interesting distinction between fitting in and standing out. With no real rules of fashion or etiquette many of us flounder and fall back on the “I want to be comfortable” which includes soft jersey fabrics but also implies feeling comfortable in your environment.
Personally I do what I can to look good, but I don’t want to stand out too much. We have a couple of guys at work who wear three-piece suits and they stand out as being rather overdressed (our customer group is generally poor and very diverse). But I don’t like to be underdressed either. Today, as it is very hot in London I am wearing a yellow dress. It is nicely made with a few interesting features and I have added a red leather belt. The dress itself could be worn for a formal occasion with a hat, jacket or flashier jewellery. Today I am accessorised to some extent (earrings, necklace, nice shoes, colourful glasses, rings, watch). On Fridays we seem to have moved towards “dress down Friday”. Many colleagues wear jeans but often with a smart top or something colourful. I would say on the whole that the average colleague looks good on a Friday, perhaps more so than the rest of the week as they feel freer to be themselves. I wear jeans very occasionally to work. But only when I have no external meetings. If I am meeting a tenant, board member or partner organisation I would generally dress a little more formally so they would never feel that I was disrespectful.
And there is another consideration – do we want to be approachable or authoritative ? At a tea party for an older lady I would want to show respect but also to be approachable. I wouldn’t want to wear a formal suit or a stiff dress and gloves – unless the old lady was the Queen!
The key for me is to try to get a balance – just enough authority to be able to do my job as a senior manager, but sufficient approachability so no one feels uncomfortable around me. I want to look stylish and slightly cool, but I certainly don’t want to draw too much attention to myself. I would go for relatively subtle details rather than cutting edge fashion. I like to get a few up-to-the-minute items each year – which may be a T-shirt, or a pair of shoes or an accessory, and combine this with more classic items. My advice is to go down the middle. Not too dressy and not too dressed-down. Not too authoritative but not so casual you could be gardening (eg shorts, flip-flops, torn or paint spattered clothing). Not to0 stiff and not too slobby (PJs, elasticated things). Not too different, but not too samey.
This is probably awful advice. Meaningless middle of the road stuff. But I would like to encourage individuality, self-expression, and diversity. I want to say “I care”. About myself and about you. And caring about my appearance is part of respect (of self and others) and caring for others. Give them something nice and interesting to look at when they are talking to you.
The way I try to achieve this approachable yet authoritative, different but understandable, neither over or under dressed is to combine looks and elements.
- Jeans with a formal shirt or jacket
- A dressy lace skirt with informal footwear.
- A miniskirt with thick tights and masculine shoes
- A tailored skirt with a hand knit jumper or down jacket
- Pinstriped suit with a corset (I am joking about this one!)
Even something like cargo pants (without the weird phone accessory, carabiner clip and dibber) could look dressy with different shoes, a more formal top and a smart belt. Again the shoes and blouse would be more than fine for a party with a fashionable skirt.

For me “slob” and “slovenly” have connotations perhaps of looking down on people, which is an added complication. I don’t want to judge others – there are many reasons why people dress down – usually due to feeling insignificant, un-confident, and sometimes due to depression etc. Sometimes people are simply natural dressers and really aren’t interested in clothes or dressing up.
Nice clothes can make you feel a lot better but not if you are shamed into changing. Dressing down, and dressing up, sends a message. Sometimes the sloppy look is adopted as an act of rebellion, or to belong to the group. And sometimes you really don’t have the time or money to do much better. When people are ill, or disabled or mentally low having nice clothes, hair, teeth and make up can make them feel better. But getting there may not be feasible. When I had lots of little kids I literally dressed in what I had taken off the previous evening, shoved a spare nappy into my pocket and dragged the children to school. Only after they were gone could I have a bath, get dressed in fresh clothes and try to improve my appearance.
What do you think?
The Dress Like Frida Sewalong Week 1

My last post got a fantastic response – over 25 comments, and many of you have signed up to the Sewalong. A sewalong, for those who haven’t had a go before, is an opportunity for a group of people to work on a similar project and to share their ideas, learning and results. By working together (virtually) we can help each other and compare notes, and at the end I will bring together photographs of us dressed like Frida!. There will also be an Instagram hashtag #dresslikefridasal. OK!
I have already gathered a few resources for you and I don’t want to overwhelm anyone. This could be quite a big project. So I thought I would outline the “programme”, so you can see when I will deal with each subject. I will post every Tuesday for the next seven to eight weeks. I know some of you want to make a Huipil right now! I sympathise sister! I have made two already. This is a very exciting project for many of us. My excuse is that I need make a few things in advance so I can offer useful advice and guidance for those who are less confident or experienced. I suggest you just pause for a week and have a think about what you are going to do, and make a little plan.
The programme
Week 1 (17 July): General discussion on Frida Kahlo’s style, influences, and the main wardrobe items. You can start making relevant items, but having an overall idea of the outfit before you start is a good idea, especially with regards to colour. I suggest you use this week to think about how you would like to look, and to gather suitable materials such as fabric, sentimental items, yarn, braid, and any small items you want to incorporate. For example I have a little cat bell that I have to get in somewhere (Frida had them on her shoes).
Week 2: (24 July) How to make a Huipil – potential patterns, and for those who don’t want patterns, just the measurements, and suggested construction methods
Week 3: (31 July) Embellishment – for your Huipil, skirt or shawl
Week 4: (7 August) The skirt
Week 5: (14 August) The head-dress
Week 6: (21 August) Shawls, jewellery, make up and styling
Week 7: (28 August) Final discussion, learnings and hopefully some photographs. With dogs, monkeys, or even rotund muralists. The choice is yours! There are likely to be a few people who take a little longer – if so I will do a second photography post later in September.
Week 1 Frida’s Style

Firstly have a look at images of Frida herself. There are many photographs of her throughout her relatively short life. Her German father was a professional photographer and she was frequently photographed; in love, in bed, in her corsets and naked, and even after death. And in most photographs she is dressed up. She presents herself as an object, in a very particular way, for the viewer to appreciate and enjoy. Despite her poor health, painful conditions and significant disabilities she always dressed artistically and deliberately. She arranged (and, at one point, cut off) her hair; she wore make up, jewellery, fresh flowers, and extraordinary clothes, many purchased especially from the Oaxaca region where indigenous people, many of whom do not speak Spanish, have a wonderful range of folk traditions, including textiles and embroidery. Frida was especially attracted to these fabrics and styles and incorporated them into her everyday wear. Frida’s mother was Mexican and she already adopted many local looks, and made clothes including for the young Frida, using elements from Mexico’s indigenous and traditional styles.
In addition to the marvellous photographs, including for Vogue magazine, there are of course paintings. Frida’s subject was more or less herself, and most of her work is the self-portrait. These are the most telling and intriguing artefacts we have to consider, and these add depth to our understanding of Frida’s dress and appearance.
When you look at these image take in the attractive colour combinations Frida created. Look at the proportions and balance she achieved. The full hair and decorative elements on her head balance out the fullness and length of her outfit. Consider if you want a similar silhouette or if you are going to do something different to ensure the elements of the outfit suit your figure and colouring.
Look at the fabrics you will use for the huipil and the skirt. Are they good together? They may match, or co-ordinate, or may complement each other in an interesting way. If they don’t really “go” is there something you can do with your trimmings or by introducing a new printed element to draw them together?
Finally don’t get completely caught up in the Mexican aesthetic. Frida looked marvellous in jeans and a cardi, with a gingham blouse. And a monkey. We are trying to take something of her spirit and style. We want something we can wear at home, or to go out in, not Fancy Dress (I’m not stopping you if that is what you want to do, by the way – but my main intention is to adopt something of her artistic creativity in dressing for our contemporary lifestyles, rather than just taking her influences and copying them).

I have put together a Dress like Frida Pinterest page.
Whose culture is it anyway?

Interestingly, but understandably, some of my North American friends are sensitive to any possible accusation of cultural appropriation if they were to dress up in Mexican styles. I don’t think there is the same anxiety in the UK. But in any event most of the elements of Frida’s style can be seen in just about every folk tradition, so you may wish to pick something closer to home.
I have Welsh ancestry, and of course a Welsh surname. Here are some Welsh outfits that share many of the elements we see in Frida’s dress. Long full skirts with aprons or overskirts, lace, locally woven fabrics, short blouses, wrap jacket or shawls, mixed fabrics and patterns, and elaborate head-coverings. (I love the nonchalant knitting too!)


You will find lots of similar ideas across Europe – German, Swiss, Danish, Spanish, Romania, and Russian folkwear all undoubtedly contain a range of very similar elements. Here are some girls from Brittany, in Northern France, wearing versions of their traditional and colourful, regional dress. There are flowers, ribbons, strong colours, hand-made lace, layers, gathered skirts and uniformity of silhouette.

Of course there are versions from India and African countries too – here are just a few historic and modern interpretations.


You may notice large, showy jewellery, locally produced fabrics, print and pattern mixes, long oiled hair with centre partings, full skirts, T-shaped tops. Frida was appropriating traditional elements of her own national dress – why not discover what your ancestors wore and see if you might include an element of two in remembrance of them? Helene is going to research French Québécois traditions.
How would you sum up Frida’s wardrobe style? Is there anything particular you like about Frida’s style? What are you planning to make? Are you going to bring in some sentimental or vintage items? Do you have extraordinary elements you are dying to use? Do you have a colour scheme in mind? Have you pulled together your own fabrics and ideas? If so please share below or on Instagram (use our hashtag #dresslikefridasal) or Pinterest. And if you want a free Huipil pattern in the meantime, here is one that the V&A prepared earlier. I’ll suggest a different approach next week.
Elizabeth Zimmermann Seamless Raglan Knit-along #6
Is your Elizabeth Zimmermann sweater nearly finished?
I am pleased to say I got mine done, but was easily beaten by Fadanista Sue. What a wonderful colour scheme she has chosen! Deep, warm colours. So vibrant and fun and just what I had hoped we might achieve. Well done for coming in first and setting the bar high Sue. I hope I can get a model pic from you soon.

I have been following what everyone has been doing via Instagram (although I know not everyone is on there). We have had a lot of fun using up small bits of yarn. We have enjoyed choosing colours and seeing how they work together – being a textile artist rather than buying someone else’s colour choice (eg a RTW item, or variegated yarn). Making your own textiles is such a wonderful and freeing experience. Putting a palette together that suits your colouring and personality is really satisfying. Sue S has chosen a great palette here, although I know she frogged it more than once in a fruitful search for an interesting and lively style. Sue N from New Zealand started with a lot of warm yellows and browns but found the mix unsuitable, so added some greys and blues and it has come out beautifully. Michelle experimented with different widths of colour (mainly turquoises) until she was happy with the balance. I think her finished jumper will be wonderful too. So hopefully as well as going off piste and knitting without a pattern, the Elizabeth Zimmermann way, we have all gained a new sense of creating our own fabric, in our personal colour scheme. I can’t wait to see all those beauties, modelled by their makers.
Borders
Let’s cover what needs to be done to finish your jumper . Once you have completed enough short rows to create the kind of shaped neckline you wish for then you need to apply the border of your choice at the neck. I chose the old 1×1 ribbing favourite, but I noticed Sue used a garter stitch finish (although I have not seen her EZRaglan being modelled yet). Others have gone for moss stitch or possibly a 2×2 rib. Now if you want a little more build up at the back you can do it on the border, adding a couple of short rows where you need it – maybe from the mid-sleeve point or further towards the back. Certainly with ribbing this is very easy to do, again using that lovely German short row technique.
On my green sweater I did ribbing at the start of the bodice and sleeves so all I had to do at the end was some ribbing at the neck.
The other very nice finish is of course the hem, although I have found this less good at the neck line. But it can be done. But you can use different borders of course and I have done hems at the cuff and at the hip, and then done ribbing at the neck. I will link to how to do the hemming as it is a very nice technique.
Once you have your borders done all you have to do is to sew up your sweater at the underarm and then weave in your ends.
Sewing up the underams
The underarms are joined with Kitchener stitch. i always go back to the same tutorial from Craftsy. I seem (excuse the pun) unable to do this stitch without the instructions. Every time I do the underarms this way I get a little better, but I struggled a bit with this sweater. I had to pull one out and do it again. You do have to concentrate and keep it nice and clean. However, done well, it is lovely and discrete.
Finishing the sweater
And finally weaving in the ends. This is the down side of stripes! The payback for all the fun we had as we stripe’d away.
How do you do it? I just get a needle and put the TV on, and do the best I can to make the ends disappear on the inside of the bodice and sleeves. It is a bit of a bore. To be honest apart from the ones near the cuffs and hem you don’t have to do every single one, because no one will ever know. But then I am a bit of a naughty bodger and many of my dressmaking adventures have been worn before they are truly finished. Luckily we have Helene knitting along with us and she is old-school, and correct and makes the most beautiful things properly, by the book and to an extremely high standard. So she may have some better advice.
And finally there is the soaking and blocking and of course you know I don’t bother. I just put the jumper on and wear it as many times as I can before the careful first wash (in a washing machine I am afraid). There is lots of advice on blocking and soaking but I haven’t got round to trying it yet. Again I shall let someone more experienced than I guide you there.
Finally I will leave you with a photo of my efforts but I don’t want to be alone out here. It was cool in the Cotswolds on Friday evening and I was glad to have a jumper to put on.
As soon as you finish please send me a photograph. I will do a final post (or two) with your pictures over the next week or two.

You must be logged in to post a comment.